Saturday, September 21, 2013

Logging camp cabins, outhouses, and a boat

I have a problem staying on just one project.  Maybe I like multitasking, then again, maybe I am really bad at it, as I have several projects that I started over a year ago, and still don't have done.  Given that, why would I start more projects?  For my logging operation, I needed some cheap housing, and came across a couple Atlas cabins at a swap meet for .50 cents each, and realizing I had three Atlas lumberyards that I was going to kitbash, I could then have five logging cabins, which would be enough.  I built them over the weekend a few weeks back.

I painted them up, but in colors that actually are close to the original plastic colors.  I threw away the formed bases that came with the models, and put the cabins up on skids made from strip wood.

These will be a good contrast to the log slab siding cabin that I will use for an office for the camp.  It was 3d printed, and here is a link to the final pictures of that project. http://nvrr49.blogspot.com/2013/08/log-slab-siding-cabin-update.html


I picked up a two pack of outhouses from Built-rite Models, http://built-ritemodels.com/models.html, and assembled them for the logging camp area.


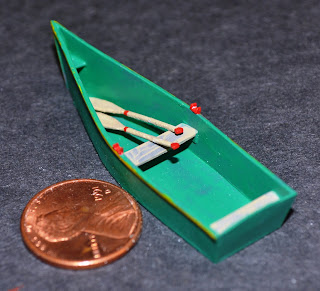
The boat was scratch built out of styrene, just for the heck of it.  This was built based on plans in Model Railroader in March 1985.  I designed the ores and had them printed at shapeways.com.  I guess I can use this around the logging site.

Tuesday, September 17, 2013

Storm Shelter, Down on the Farm #2

Back with the second entry of my Down on the Frame series.  The first was the smokehosue, http://nvrr49.blogspot.com/2013/09/smokehouse-ho-scale-3d-printed-down-on.html.  As with most of the structures to be used on this diorama, the plans are from the University of South Dakota.  Many rural farms have concrete storm shelters, and having traveled many of the back roads in the plains, I have seem them everywhere.  


Here are the plans from the SDSU web site.  Since I do not have an exact plan for the diorama, I decided to model the storm shelter two ways, with the door closed and the door open, showing the stairs.

First the door closed version.  When orienting the item for printing, it is important to consider the layering that appears in the printing process.  Layering shows it's ugly head the most when printing any non vertical or horizontal surface.  For that reason, I oriented the face of the doors horizontally, then added some support to be cut off later to level things up.

This is a shot of the storm shelter as it come off the Afinia printer.  Note the door section is level on top.  Also note the horrible layering showing on the roof.

After priming, it always looks worse.  In this case, it was made worse by my design.  I made the roof too thin, and, in this case, it is so thin you could see through it.  As soon as I print something, find the problems, there is almost always at least one, I fix the drawing.  This was a usable item, in my opinion, and I have no plans on ever printing it again, but if I do, it will be better next time, whether for myself or someone else.

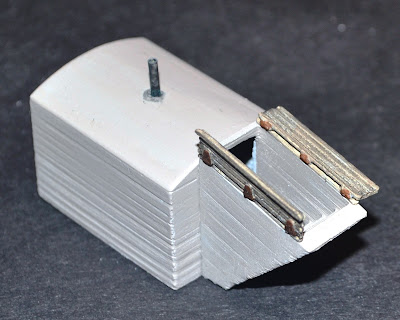
Here is the shelter assembled and painted.  A little sanding, and a second coat of primer does wonders for the layering.  Similar to working with a questionable casting.

I added a vent pipe, and weathered it with Sophisticated Finishes rust.  I used alcohol and ink to weather the boards.  Another change I made on in the drawings after this first print, I added knuckles to the hinges.  Given there very small size, I am not sure they were worth the effort, but we will see if I ever have occasion to print this again.

The drawing for the door open version was problematic, in how to orient the doors for printing.  The doors had to be printed separate from the boards on the sides, and therefore, the hinges are split.

With primer applied, the layering looks worse than normal in this view, and in reality, the verticals are, for some reason, worse than normal.  It really does not matter on the sides, as that will be below ground level.

I assembled the doors with one open 180 degrees, the door on the right, and one open 90 degrees.  I painted the concrete with Model Flex Concrete.

I assembled the pieces using a Methylene Chloride solvent.  The ABS will also solvent weld to styrene.  The vent pipe on this was weathered with Sophisticated Finishes Bronze patina, to give it the weathered brass pipe look.   

A view of both ready to install on the layout or diorama.

Friday, September 13, 2013

Lawn Mower/Small Engine repair shop. Finished pictures

I recently realized that I had never posted any finished pictures of the Lipasek Small Engine shop.  I had post pictures of the detail, but not after the diorama was finished.  There were two earlier posts:

and

but most of the items can also be seen here.

First a couple pictures of the interior of the building.  All the details are items I designed and either printed on my Afinia printer, or had printed at shapeways.com, except the figure..

The wood barrel, the shelves, including the items on the shelves, and the foundation were printed on my Afinia printer.  All the other items were printed at shapeways.com.

With the laser cut building kit in place, this is an overview of the diorama.  The green riders are N-scale tractors to which I added 3d printed HO scale mower decks, seats and steering wheels.

Viewing the back, you can see an old engine and a couple rusted up mower decks.  The weathering powder I use for rust is Ash Grove mortar color.  I use both the Buff  and the Terracotta colors.  The foundation was my first attempt at concrete blocks on my Afinia printer.  I have figured out a lot since then, and more importantly, the software upgrades from the manufacturer have really help with quality and design elements.

Probably my favorite items are the chain saw motors, pretty detailed for 3d printing.  The mowers were quite a drawing project, but both are based on actual riders available in 1949, the year I model.

The walk behind reel mower is based on ads I found on the Internet.  Note the copy of an ad that I made in to a sign to post on the building.

The next entry will probably be the second entry in the Down on the Farm series, and will be a concrete storm shelter.

Tuesday, September 10, 2013

Smokehouse, HO Scale, 3d Printed, Down on the Farm #1

This is the first of many post on buildings and construction of  HO scale small farm diorama.  I got the plans for the smokehouse off the South Dakota State University web site, and that is where I have gotten most of the plans I will be using in this project.

Here is a copy of the plans, and here is a direct link to the web site with lots of agricultural building plans. http://www.ag.ndsu.edu/extension-aben/buildingplans/


This is the drawing I did in SketchUp, and exploded and oriented for printing on my Afinia printer.  

The raw print, above, has had support material and raft removed.  It is really hard to see any flaws, soooo

I throw a wash of alcohol and India ink on it to show the details, and/or flaws.  Although it is still a little hard to see, the roof, because of the slope, shows a lot of layering.  Most vertical and horizontal surfaces print relatively flat, but angled surfaces will be stepped, and show the layering that is part of the printing process.

A little filing, just like cleaning up a white metal casting, and you end up with a nice looking cast concrete roof.  The ABS plastic solvent welds together with any Methylene Chloride glue available at most hobby suppliers.

The door hinges are from Grandt Line, and the door handle is a round piece of plastic, nothing special

I weather it up pretty heavy, to give it that used look.  

In this view, and the one below, you can see the clean out door.  When installed in the diorama, the pit on the right end will be filled with ash.  How do you model ash in HO scale?  How about Oak logs, small fire wood size?

The finished model, ready for installation on a diorama.  For the smoke residue, I used weather powders from Ash Grove.

I am not sure what my next post will be, as I have 4-5 drafts going at any one time.  I do know that the next installment in this series will be a concrete storm shelter, and the third Down on the Frame post will be a slaughter house.

Saturday, September 7, 2013

2-4-4-0 Steam Engine, kitbashed HO scale

This is a static (non-powered) model assembled from a long out of production Roundhouse 3-1 kitbashing kit.  This kit is part of a long out of production series of kits designed to be kitbashed.  Most included three different projects, this one, even though it is called a 3-in-1 kit, it is really just one, but it can be built may different ways.  As is the case with all these kits, there is a lot of cutting and fitting involved, and outside parts that must be added.  Below is one of 12 pages of instruction, not detailed instructions, but ideas on different ways one might build the engine.  With all the different options, there will be lots of parts left over to use for junk around the railroad yard.


Instructions for this and other kits may be accessed through this link.  Gerry Dombroski was one of the designers on several of the kits, and has put together a great resource here.
 http://kitbash.ourpage.com/index-linked.htm

Here are a couple views of the kit ready to be weathered.  Since I have never weathered a steam locomotive, I am looking for direction.  I plan on this being a derelict engine, setting on an overgrown siding.

An overhead shot.  Any feedback on weathering and/or additional detailing, based on the idea it is an out of service engine, is appreciated.

Yes, I do other things than just 3d printing HO scale items.  I have some logging cabins on skids I am in the process of kitbashing using some Atlas cabins.  I should have them done in a few weeks.  

BUT, I am also 3d printing all the buildings for a farm diorama.  I will be doing blog entries on it's progress, but you can follow along in one thread on mrrrforums.com.  Here is a direct link to the thread.