Showing posts with label model railroad HO scale. Show all posts

Saturday, June 24, 2023

Layout update 6/11/23


The basement has walls, and hopefully the roof goes on the house this next week.  Here is a picture of the layout area as is it right now.


Here is how I have arranged the layout at this time.   

If you click on the drawing a large version will appear. 
Since it has been a while, here is the list of Givens and Druthers.  I believe I have 
Givens 
1. It is 1949. 
2. HO scale standard gauge main line. 
3. Line runs from North Staging (KC) to Car Ferry Dock at Van Buren, AR. 
4. Within reason, modular specifications to meet Free-Mo standards 
    a. http://www.free-mo.org/standard/ 
    b. 42” minimum radius on the main line 
    c. #8 Turnouts on the main line 
5. Main cities of Joplin, MO & Springdale, AR. 
6. The town of Splitlog must be represented. 
7. 3’ narrow gauge line (Trees Unlimited) somewhere south of Springdale a. associated with a large sawmill. 
8. 30” narrow gauge somewhere 
9. 18” operating mine railroad 
10.Interchanges:
    a. ATSF, MKT, KCS, MoPac & Frisco in Joplin. 
    b. Frisco in Springdale
    c. MoPac, KCS, Frisco in Van Buren 
11.Joplin Union Station will be massively compressed, flat on the back with taller building flats attached to the back. I will have to do a drawing to make that make any since. 
 
Druthers 
1. Gulf Oil refinery somewhere south of Joplin. 
2. 36” aisles 


The layout sections are 26' in depth except for at Van Buren where it is 33".  Almost all section of the layout can be operated from both sides.  The only exceptions are this time are Joplin and the section with the large sawmill.  The concept for those two sections are shown below.

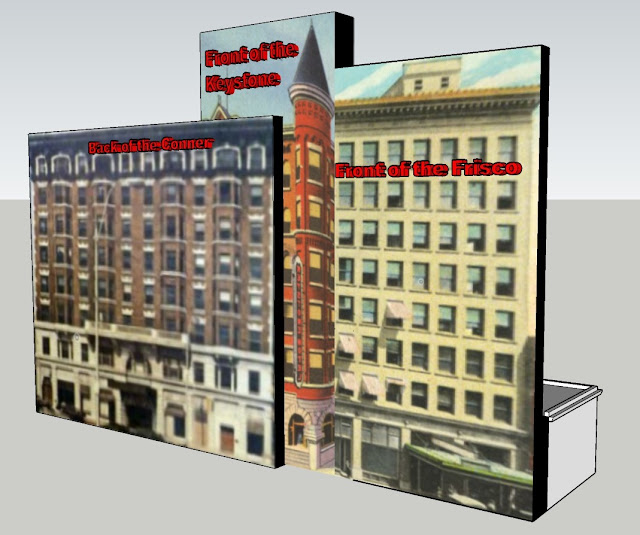
For some clarification on the Joplin section, here are some concept drawings.


The station and hotels will sit where indicated.  The Joplin station track side will have some depth to it, but the hotels will be flats.  I will have to get an artist to draw the hotels, as pictures of the back of the hotels are sketchy or non-existent.  I plan on mounting the hotel drawings on black foam core to give them some semblance of depth.  The total depth, as currently planned, will be about 6", and the length will be somewhat longer the 12", and about 7" tall.  The dark blue is the main line, and the light blue are passing sidings.


Between Joplin and Springdale the elevation of the main line will rise 3-4 inches, and this module is just south of Springdale.  Again, the standard gauge main line is in dark blue.  With the exception of this section, the layout could be run as double track, as there are passing sidings the entire length.  The 3' gauge track and the sawmill are on the upper portion blocked from this side by trees, lots of trees.  Viewing from this side, there is an 18" (Z scale track) mining railroad at zero elevation and it loops under the standard gauge and the sawmill.  Also, at the far right, you can see a small red section, that is the 30" gauge railroad that will be hauling the mined product away.  What are we mining, maybe unobtanium, maybe Vibranium, maybe?


Friday, December 25, 2020

Dixie Garage, Carolina Craftsman Kit

I have not been posting for over two years, and the main reason is I would rather spend time modeling than posting about it.  Therefore, don't expect any detailed descriptions, as not much time or thought is going into posts going forward. 

 The parts of the kit.

I am adding a garage door to the back wall, so I cut an opening using the front door opening as a template. 

I am using the scrap piece to fill in the old window opening.

I applied paper printed studs to the inside wall when the wall could be visible through the large doors.

The back patch came out pretty well.  As I recall, I used the rubber cement method for the pealing paint.  Dab some rubber cement on the siding before the finish coat of paint, then when the finish coat of paint is completely dry rub of the rubber cement.

I used a decal for the "GAS" sign, but all the others are printed on paper and glued to the building.


There a wood stove below the chimney, but it has obviously never been used, since the chimney is clean,

The truck cab is from Sylvan, and the bed and winch were 3D printed, as were the barrels, rusty fender compressor, gas bottles and wall fan.  The scuppers and downspouts were 3D printed using copper infused filament, and were weathered naturally using salt and ammonia. 

Thanks for looking.

Saturday, November 11, 2017

Mini-Lindy Kitbashes #1 & 2, Ford PU

A couple kitbashes of Mini-Lindy Ford Pickups


A shot of the two pickups, and the Packard as picked up of eBay. 

Dump Truck
A first test assembly with a dump bed I had in the parts bin.  I posted this on the 1/87 scale vehicle Facebook page for some feedback, and got just what I wanted.


I filled in the hole in the center of the hood, and 3D printed a shorter bed.

This model was missing the front grill and bumper.  I designed and 3D printed and new one. This was an early test, as I made some changes on the final assembly.

I 3D printed the frame, and made the dump bed so it would dump, although I never have found a way I liked to put a hydraulic cylinder on it.


Since the fans would be visible, I designed and printed several sizes in order to pick a size.

I fabricated the exhaust out of brass tubing.  

This model was also missing the windows, so I 3D printed a form and vacuum formed the windows.  The form is in the dump bed.


 In this view you can see the rusted exhaust manifold, another part I designed and 3D printed.

Tow/Boom Truck

I wanted to turn the other truck into a two truck.  In order to design the bed, I took straight on pictures of the truck, uploaded the pictures into SketchUp, and sized the pictures to scale.  


I drew the basic design right over the photographs to get the correct curves and dimensions.


On this one, I closed in the entire top of the hood.

I also designed and printed the boom and headache rack.  


I scratch built the winches

Sunday, January 8, 2017

Video of Machine Shop

A couple of short videos of the machine shop.  I gave it a spin on a turntable.  Construction of the building, which is 3D printed on a home printer, can be seen here.  Since the video upload to Blogger is so poor, here is a link to it on Youtube, https://youtu.be/7MQTqOybHtE


Most of the interior details I designed for printing at Shapeways.  The design details were covered in several posts last year.  The first covered the Metal Shaper and the Bandsaws.  The second instalment covered the Large Lathe, Vertical Milling Machine, Air Compressor and Bench Grinder.  The third post covered the Surface Grinder, Horizontal Mill, Drill Presses and Welding Tanks.  And here is a Youtube link for the interior video, https://www.youtube.com/watch?v=SZST7eSKWHM&feature=youtu.be.


The details from Shapeways can be purchased at:  https://www.shapeways.com/product/GK2H7F2E6/machine-shop-tool-set-2.  The set includes a smaller lathe that is not in this shop.

Thursday, January 5, 2017

3d Printed, Arch Roof, Clear side walls, Machine Shop.

Although this building has a full interior, this post will mostly cover the structure.  The building was printed on my Afinia H479 printer in ABS.  I designed it in SketchUp and sized the openings to fit Tichy windows and doors.  HO scale.

I designed the machine shop tools a year ago, and had them printed at Shapeways.  I posted about them in three previous posts.

Part one: Metal Shaper, Bandsaws
Part two: Large Lathe, Vertical Milling Machine, Air Compressor, Bench Grinder
Part three: Surface Grinder, Horizontal Mill, Drill Presses, Welding tanks


 Here are all the parts, as originally drawn.  I designed the upper side walls, and the gable ends to be printed in transparent filament.  It is marketed as clear, but it certainly is not.  I does work great for glass blocks, spiral-chimney-glass-blocks and memphis-store-front-3d-printed-glass-blocks

There are always things that I would do different if I were to do it again.  If I were to print the end panels again, I would add the support material shown in the drawing on the left, to give the panels a cleaner edges on the lower curved edges.  The picture on the right shows how I printed the ends I used.  If you look closely, you can see the rough edges.

The roof parts, painted and ready to assemble.

I would say that I am test fitting the roof on the walls, but you can probably figure that out on your own.

The roof and walls are printed in natural ABS, primed and painted, the roof silver and the walls gray.

Test fitting the Tichy Windows.  Both Grandt Line and Tichy have good web sites, where they show all the openings needed for the windows they offer.

 I had not originally planned on making a diorama, but I decided to in the end, adding a welding table out front, and a storage rack.  The storage rack was 3D printed on my printer.  The material on the rack is from the junk bin.  Mostly left over shapes from wood car kits, where I replaced the wood shapes with styrene.  

The diorama base was also needed for protection for the windows, if was was going to have any of them open.

I did add a minimal interior to the office, but unless I stick some lighting in it, it is barely noticeable. Both the rolltop desk and the chair were 3D printed in wood, so no finishing was needed. 

 I added some angle around the roof, so it would fit tight on the building. 


I am sure I forgot something, but this post is getting way to long, so I will end it here.  I prefer to spend my time modeling, versus writing about it.  I have 23 posts in various stages of editing.  Back to modeling.

Previous 3D printed structure posts that might be of interest: