Showing posts with label shapeways.com.. Show all posts

Sunday, January 8, 2017

Video of Machine Shop

A couple of short videos of the machine shop.  I gave it a spin on a turntable.  Construction of the building, which is 3D printed on a home printer, can be seen here.  Since the video upload to Blogger is so poor, here is a link to it on Youtube, https://youtu.be/7MQTqOybHtE


Most of the interior details I designed for printing at Shapeways.  The design details were covered in several posts last year.  The first covered the Metal Shaper and the Bandsaws.  The second instalment covered the Large Lathe, Vertical Milling Machine, Air Compressor and Bench Grinder.  The third post covered the Surface Grinder, Horizontal Mill, Drill Presses and Welding Tanks.  And here is a Youtube link for the interior video, https://www.youtube.com/watch?v=SZST7eSKWHM&feature=youtu.be.


The details from Shapeways can be purchased at:  https://www.shapeways.com/product/GK2H7F2E6/machine-shop-tool-set-2.  The set includes a smaller lathe that is not in this shop.

Thursday, January 5, 2017

3d Printed, Arch Roof, Clear side walls, Machine Shop.

Although this building has a full interior, this post will mostly cover the structure.  The building was printed on my Afinia H479 printer in ABS.  I designed it in SketchUp and sized the openings to fit Tichy windows and doors.  HO scale.

I designed the machine shop tools a year ago, and had them printed at Shapeways.  I posted about them in three previous posts.

Part one: Metal Shaper, Bandsaws
Part two: Large Lathe, Vertical Milling Machine, Air Compressor, Bench Grinder
Part three: Surface Grinder, Horizontal Mill, Drill Presses, Welding tanks


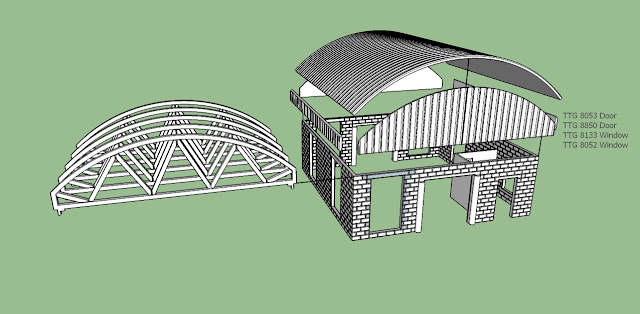
 Here are all the parts, as originally drawn.  I designed the upper side walls, and the gable ends to be printed in transparent filament.  It is marketed as clear, but it certainly is not.  I does work great for glass blocks, spiral-chimney-glass-blocks and memphis-store-front-3d-printed-glass-blocks

There are always things that I would do different if I were to do it again.  If I were to print the end panels again, I would add the support material shown in the drawing on the left, to give the panels a cleaner edges on the lower curved edges.  The picture on the right shows how I printed the ends I used.  If you look closely, you can see the rough edges.

The roof parts, painted and ready to assemble.

I would say that I am test fitting the roof on the walls, but you can probably figure that out on your own.

The roof and walls are printed in natural ABS, primed and painted, the roof silver and the walls gray.

Test fitting the Tichy Windows.  Both Grandt Line and Tichy have good web sites, where they show all the openings needed for the windows they offer.

 I had not originally planned on making a diorama, but I decided to in the end, adding a welding table out front, and a storage rack.  The storage rack was 3D printed on my printer.  The material on the rack is from the junk bin.  Mostly left over shapes from wood car kits, where I replaced the wood shapes with styrene.  

The diorama base was also needed for protection for the windows, if was was going to have any of them open.

I did add a minimal interior to the office, but unless I stick some lighting in it, it is barely noticeable. Both the rolltop desk and the chair were 3D printed in wood, so no finishing was needed. 

 I added some angle around the roof, so it would fit tight on the building. 


I am sure I forgot something, but this post is getting way to long, so I will end it here.  I prefer to spend my time modeling, versus writing about it.  I have 23 posts in various stages of editing.  Back to modeling.

Previous 3D printed structure posts that might be of interest:


Sunday, November 13, 2016

Gulf Gas Station, HO Scale, 3D Printed


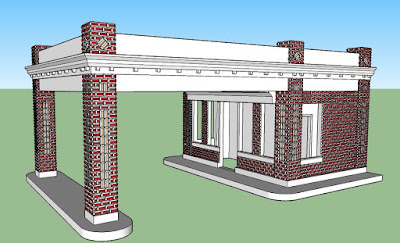
There are several illustrations of Gulf similar gas stations, and I designed one closest to this one depicted on an ink blotter.  

The numbers in the upper right, are Tichy Train Group numbers and sizes for their stock windows.  I sized the openings to fit these windows, or in the case of the front windows, I did have to kitbash the windows, making them one windowpane narrower. (who knew windowpane was one word?)

I usually draw the complete item, then figure out how I am going to break it up for 3D printing.

Here is the exploded view.  With it cut up like this, I did not have to have any support material.

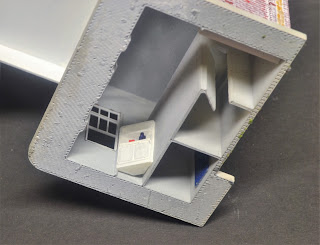
The major parts of the structure.  The center section was printed upside down, which eliminated an support material. Now they just need glued together.

There is not such thing as having to many clamps.  Since I printed this in ABS, it is easily solvent welded with Methylene Chloride.

I inserted sheet styrene for the roof before installing the top section.  Most of the time I prime the ABS with a primer with filler to help fill in and hide the layering.

Test fitting some of the 3D printed details for the outside and interior.

The finished building, sitting on a temporary base.

I added gutter and downspout to the rear.

I installed shelving on this side wall, across from the men's room.

I put angled shelving behind the desk.

I temporarily installed the interior for these pictures.

Installed on its temporary display base.  Signage still to be added.


Sunday, July 31, 2016

Chainsaws update, 3d printed in HO, O, S and N scale

I posted about the 3D printed chainsaws preciously, http://nvrr49.blogspot.com/2015/05/chain-saws-ho-scale-3d-printed.html, but I have since added S and O scale sets.  I also added to the HO scale set.

This is a picture of some of the HO scale set.  These were printed at Shapeways, and printed in FUD, Frosted Ultra Detail.

I tried to keep the costs down, so the HO scale set has more pieces than the S or O scale sets.  This is the drawing for the HO scale set.  Seven complete chainsaws, and four extra motors.

This is the original set, in HO scale, as it came from Shapeways.

This view shows, from left to right, N, HO, S and O scale.  Once cleaned up, the Frosted Ultra Detail material tends to turn white.  Note that the blade on one of the O scale saws broke off, easily glued back on.  The HO scale saws are available for sale at Shapeways at this line, chainsaws-group-2-ho-scale.

The S scale set is a available at: \chainsaws-group-2-s-scale.

The O scale saws are available at: chainsaws-group-2-o-scale

The N scale saw, which Shapeways says they will not print again due to their fragility.  They are crazy small.


Monday, May 30, 2016

Wall details, 3D printed in HO scale

For custom details, Shapeways is the way to go.  This assortment is all wall details.  Some of these I had printed before, others, this is the first time.  The set includes a lot of parts.

 There are two different gas meters, two of each.

A selection of pipes to run along the walls. 

 Four different wall vents, four of each.  Three of them are see through, the four smallest are surface mount.

 Four wall fans, and two types of electric meters, four of each.  

 Roof drain scuppers.

Two types, eight of each.  Four coal doors, a set of six mail boxes )note the raised lettering for the apartments).  There are also two size of fire sprinkler connections, four of each.  I have since added four alarm bells to put on the outside wall of the building.

There is a large selection of tension rod washers (sometimes called stars).  Nine styles, eight of each.

Here are a few pictures of the tension rod washers.  These are based on prototype pictures, and are used on most older masonry buildings.  These are HO scale, so the are between 1/8" and 1/4" in size.


There are eight of each of the tension rod washers in the set. 

Here is one installed on a building, an old Roundhouse kit.

 The smaller gas meter, and the piping. 

Here is an example of how I used the pipe, and you can also see more of the tension washers.

 Here are the larger gas meter, and four wall mount fans.  

 At the top of the picture  are the fire alarm bells and the eight fire hose connections.  Next down is the apartment mail boxes with raise lettering. And, at the bottom are the scupper (flat roof downspout drain), two styles.

Here is another shot of the mail boxes and fire apparatus.  To the right are eight electric meters, four of two different styles.  The connections can easily be filed off if needed.  

The electric meters installed on an apartment building.

The mail boxes.

Sixteen vents, four sizes.  The small vents to the right are surface mount, the rest are see through, i.e. real vents. You can see the copper penny through the vents.  The coal doors are in the upper right.

I held the larger vent up to the light for this picture.  One has to be very careful to not fill the vents up when painting.

I added a coal door to this apartment building.

Here is a link to these items on Shapeways, should anyone be interested.  https://www.shapeways.com/structure-exterior-wall-details

I did not expect to ever sell the piano store, it was just something I wanted, but I have sold a couple sets, https://www.shapeways.com/piano-store-stock

Here are some links to other details I have designed and had printed at Shapeways.