Back with the second entry of my Down on the Frame series. The first was the smokehosue, http://nvrr49.blogspot.com/2013/09/smokehouse-ho-scale-3d-printed-down-on.html. As with most of the structures to be used on this diorama, the plans are from the University of South Dakota. Many rural farms have concrete storm shelters, and having traveled many of the back roads in the plains, I have seem them everywhere.

Here are the plans from the SDSU web site. Since I do not have an exact plan for the diorama, I decided to model the storm shelter two ways, with the door closed and the door open, showing the stairs.
First the door closed version. When orienting the item for printing, it is important to consider the layering that appears in the printing process. Layering shows it's ugly head the most when printing any non vertical or horizontal surface. For that reason, I oriented the face of the doors horizontally, then added some support to be cut off later to level things up.
This is a shot of the storm shelter as it come off the Afinia printer. Note the door section is level on top. Also note the horrible layering showing on the roof.
After priming, it always looks worse. In this case, it was made worse by my design. I made the roof too thin, and, in this case, it is so thin you could see through it. As soon as I print something, find the problems, there is almost always at least one, I fix the drawing. This was a usable item, in my opinion, and I have no plans on ever printing it again, but if I do, it will be better next time, whether for myself or someone else.
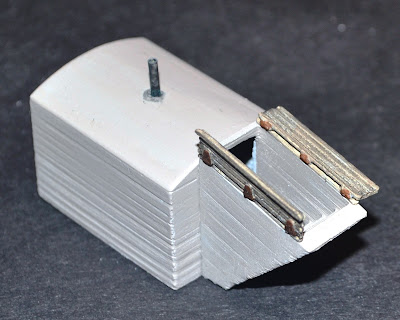
Here is the shelter assembled and painted. A little sanding, and a second coat of primer does wonders for the layering. Similar to working with a questionable casting.
I added a vent pipe, and weathered it with Sophisticated Finishes rust. I used alcohol and ink to weather the boards. Another change I made on in the drawings after this first print, I added knuckles to the hinges. Given there very small size, I am not sure they were worth the effort, but we will see if I ever have occasion to print this again.
The drawing for the door open version was problematic, in how to orient the doors for printing. The doors had to be printed separate from the boards on the sides, and therefore, the hinges are split.
With primer applied, the layering looks worse than normal in this view, and in reality, the verticals are, for some reason, worse than normal. It really does not matter on the sides, as that will be below ground level.
I assembled the doors with one open 180 degrees, the door on the right, and one open 90 degrees. I painted the concrete with Model Flex Concrete.
I assembled the pieces using a Methylene Chloride solvent. The ABS will also solvent weld to styrene. The vent pipe on this was weathered with Sophisticated Finishes Bronze patina, to give it the weathered brass pipe look.
A view of both ready to install on the layout or diorama.


My first thought at seeing this shelter is .. "dang it .. I need one of those". Every time there is bad weather and the news goes on with warnings my thought is .. "Ok. Now what?" .. since as far as I know .. no one around me has a shelter of any kind.
ReplyDeleteI give you thumbs up for fighting though the layering problems. I'm still sitting back and waiting for the next generation of home based printers .. while admiring you pioneers! :)
I did a search on Methylene Chloride solvent and came up with Weld-On 4 Acrylic Adhesive. Huh. Need to try that out
Methylene Chloride is marketed as several different brands, Tenax, Ambrod ProWeld, and Micro-Marks Same Stuff, are... well... the same stuff, Methylene Chloride.
ReplyDeleteThe next generation for home use is the liquid resin printers, and are out of my price range at this time, with the one I want at $3200.
Are you going to make this available on Shapeways?
ReplyDelete