Showing posts with label HO logging. Show all posts

Sunday, July 31, 2016

Chainsaws update, 3d printed in HO, O, S and N scale

I posted about the 3D printed chainsaws preciously, http://nvrr49.blogspot.com/2015/05/chain-saws-ho-scale-3d-printed.html, but I have since added S and O scale sets.  I also added to the HO scale set.

This is a picture of some of the HO scale set.  These were printed at Shapeways, and printed in FUD, Frosted Ultra Detail.

I tried to keep the costs down, so the HO scale set has more pieces than the S or O scale sets.  This is the drawing for the HO scale set.  Seven complete chainsaws, and four extra motors.

This is the original set, in HO scale, as it came from Shapeways.

This view shows, from left to right, N, HO, S and O scale.  Once cleaned up, the Frosted Ultra Detail material tends to turn white.  Note that the blade on one of the O scale saws broke off, easily glued back on.  The HO scale saws are available for sale at Shapeways at this line, chainsaws-group-2-ho-scale.

The S scale set is a available at: \chainsaws-group-2-s-scale.

The O scale saws are available at: chainsaws-group-2-o-scale

The N scale saw, which Shapeways says they will not print again due to their fragility.  They are crazy small.


Saturday, October 26, 2013

Long-Bell Lumber, Atlas Lumber shed

I wanted to build a lumberyard using the Atlas plastic kits, but wanted to make it a larger, multiple building complex.    Using three Atlas kits, I am going to kitbash one in to an office and hardware sales area, build one mostly stock, and kitbash the third to be all lumber, and no saw area.  I am going to show the building of the third unit in this entry.

The preliminary layout is shown above, with some creosote treated lumber in the upper right and some coal bins in the lower right.  Previously I have built the Fine Scale Miniature Barnstead Lumber and blogged about it here: http://nvrr49.blogspot.com/2013/07/fsm-barnstead-lumber-ho-scale.html.  I love lumberyards, logging and the related industries.

I bought three of the kits on special.

Since I was not using any of the interior on the building I am using as the office/showroom, I was able to cut those parts to fill in the loading dock area to store lumber using those parts.  I assembled it on the supplied base, but did not glue it to the base yet.

I cut most of the base away, and the small office that comes with this kit, I had already stolen for use in my logging camp.  http://nvrr49.blogspot.com/2013/09/logging-camp-cabins-outhouses-and-boat.html

Here is the assembled model, before painting.  Note the base has been trimmed to fit the structure.  I wanted most of the plastic on this model to look like weathered wood.  I painted all the wood portions of this model with a light tan color, then used Alcohol and Ink to weather the boards.  

I also dry brushed some gray paint on the boards to simulate some old paint, and some white on the trim.  Long-Bell Lumber, a Kansas City based company, painted their structures gray with white trim.  I cut stripwood to fill the bins.  I have not glued them in place yet, as I have not finalized how I will arrange the lumberyard.  I also made some units of plywood, shown here in the four bins to the lower right.

I cut sheets of plywood from 110# card stock that I had printed cut line on.  I also had a color print of several different types of plywood to put on top of the stack.  The edged of the cut paper were colored with colored pencils, and the glue was brushed on the sides of the stacks to hold them together.

For the taller plywood stack, I glued the colored plywood to a block of balsa, just to see how it would look.  Certainly easier than cutting all that paper.  The right side of the building had some cast on detail that I removed, and the scribed the siding back in place.  The base was painted ModelFlex Concrete. 

Next in this series, I will cover the structure built stock, as the manufacturer intended.  That will be a quick entry. 

Saturday, September 21, 2013

Logging camp cabins, outhouses, and a boat

I have a problem staying on just one project.  Maybe I like multitasking, then again, maybe I am really bad at it, as I have several projects that I started over a year ago, and still don't have done.  Given that, why would I start more projects?  For my logging operation, I needed some cheap housing, and came across a couple Atlas cabins at a swap meet for .50 cents each, and realizing I had three Atlas lumberyards that I was going to kitbash, I could then have five logging cabins, which would be enough.  I built them over the weekend a few weeks back.

I painted them up, but in colors that actually are close to the original plastic colors.  I threw away the formed bases that came with the models, and put the cabins up on skids made from strip wood.

These will be a good contrast to the log slab siding cabin that I will use for an office for the camp.  It was 3d printed, and here is a link to the final pictures of that project. http://nvrr49.blogspot.com/2013/08/log-slab-siding-cabin-update.html


I picked up a two pack of outhouses from Built-rite Models, http://built-ritemodels.com/models.html, and assembled them for the logging camp area.


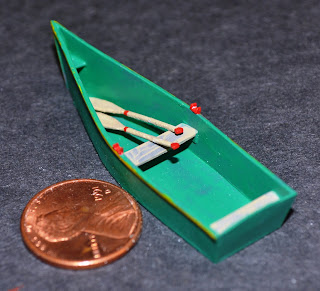
The boat was scratch built out of styrene, just for the heck of it.  This was built based on plans in Model Railroader in March 1985.  I designed the ores and had them printed at shapeways.com.  I guess I can use this around the logging site.

Saturday, September 7, 2013

2-4-4-0 Steam Engine, kitbashed HO scale

This is a static (non-powered) model assembled from a long out of production Roundhouse 3-1 kitbashing kit.  This kit is part of a long out of production series of kits designed to be kitbashed.  Most included three different projects, this one, even though it is called a 3-in-1 kit, it is really just one, but it can be built may different ways.  As is the case with all these kits, there is a lot of cutting and fitting involved, and outside parts that must be added.  Below is one of 12 pages of instruction, not detailed instructions, but ideas on different ways one might build the engine.  With all the different options, there will be lots of parts left over to use for junk around the railroad yard.


Instructions for this and other kits may be accessed through this link.  Gerry Dombroski was one of the designers on several of the kits, and has put together a great resource here.
 http://kitbash.ourpage.com/index-linked.htm

Here are a couple views of the kit ready to be weathered.  Since I have never weathered a steam locomotive, I am looking for direction.  I plan on this being a derelict engine, setting on an overgrown siding.

An overhead shot.  Any feedback on weathering and/or additional detailing, based on the idea it is an out of service engine, is appreciated.

Yes, I do other things than just 3d printing HO scale items.  I have some logging cabins on skids I am in the process of kitbashing using some Atlas cabins.  I should have them done in a few weeks.  

BUT, I am also 3d printing all the buildings for a farm diorama.  I will be doing blog entries on it's progress, but you can follow along in one thread on mrrrforums.com.  Here is a direct link to the thread.