Saturday, November 11, 2017

Mini-Lindy Kitbashes #1 & 2, Ford PU

A couple kitbashes of Mini-Lindy Ford Pickups


A shot of the two pickups, and the Packard as picked up of eBay. 

Dump Truck
A first test assembly with a dump bed I had in the parts bin.  I posted this on the 1/87 scale vehicle Facebook page for some feedback, and got just what I wanted.


I filled in the hole in the center of the hood, and 3D printed a shorter bed.

This model was missing the front grill and bumper.  I designed and 3D printed and new one. This was an early test, as I made some changes on the final assembly.

I 3D printed the frame, and made the dump bed so it would dump, although I never have found a way I liked to put a hydraulic cylinder on it.


Since the fans would be visible, I designed and printed several sizes in order to pick a size.

I fabricated the exhaust out of brass tubing.  

This model was also missing the windows, so I 3D printed a form and vacuum formed the windows.  The form is in the dump bed.


 In this view you can see the rusted exhaust manifold, another part I designed and 3D printed.

Tow/Boom Truck

I wanted to turn the other truck into a two truck.  In order to design the bed, I took straight on pictures of the truck, uploaded the pictures into SketchUp, and sized the pictures to scale.  


I drew the basic design right over the photographs to get the correct curves and dimensions.


On this one, I closed in the entire top of the hood.

I also designed and printed the boom and headache rack.  


I scratch built the winches

Sunday, January 29, 2017

HOn18 Mine Cars, HO on Z scale track


I designed an HOn18 engine sometime back.  The shell fits over a MicroTrains mechanism.  Link to blog entry on the engine.


These little cars were inspired by George at Show Me Lines Trains in Grandview, MO.  He showed me a picture of a side dump car, and wanted to know if I could design and 3D print something similar? 
My first thought was, well yes, but not with my home printer, but then, I came up with some ideas to try.  One of the good things about having a home printer, is that the failures don't cost much, and now I have a lot of junk for around the mine site.  I tried more designs than I can count, most worked to some degree, but others were complete failures.  Here are a few, but not all of the different designs I tried.
 I decided early on to use Micro-Trains Z scale Arch Bar trucks as the standard to design around, and also use their Z scale couplers.  These could also be push carts, particularly in S and O scale, and then have no need for a coupler.  You will notice that the design closest to the from, has no bottom.  I designed it so that I could put a piece of brass bar in the floor to add some weight.

 Once I figured out the dimensions and shape needed to fit the trucks and couplers, I took those designs and started trying other options using the original base.

 I used .030 styrene for the connector between the tipper and the rest of the car, and thus the tippers will actually tip, as long as you only glue the styrene rod at one end.

  I am sure there are many more possibilities, and I am sure I will come back and do more in the future.

 As I mentioned above, it took several redesigns to get the trucks to fit properly.  

 Here are several early attempts.  I am never going to get a completely clean angle with and FDM printer, but it only took a little filing to get it looking reasonable.

 This kind of give you an idea of how many failures I had, just getting a square box on wheels.

 This is a good example of the layering making the item, in my opinion, unacceptable.  Note the layering on the corner boards.  It makes the "grain" run the wrong direction, horizontally, rather than vertical.  In subsequent designs, I left off the corner boards, and added styrene strips.  

A couple of things to note.  The bottom gondola has had the brass bar inserted for weight.  Also, the corner boards on these gondolas are styrene strip, which looks much better than the printed vertical boards.  The side dump cars, several different versions, various stages of completion, natural ABS, and primed.

I painted the side dump cars with Sophisticated Finishes Rusting paint.  The gondolas were painted a wood color then a wash of India Ink and Alcohol.  

The trucks were installed using the Micro-Trains pin provided with the trucks.  As I recall, I used the 2-56 tap drill size as the hole for the pin, and it worked great (there does seem to be some variation in the pin diameter).  The couplers were installed using the screws provided with them.
Here is a shot of the engine and cars sitting on some Micro-Trains Z scale track, a penny to the right for scale reference.  Again, these could also be used in S and O scale for push carts.  

Some mining inspiration, a blog post of from several years ago from the salt mine and museum in Hutchinson, KS.


Sunday, January 8, 2017

Video of Machine Shop

A couple of short videos of the machine shop.  I gave it a spin on a turntable.  Construction of the building, which is 3D printed on a home printer, can be seen here.  Since the video upload to Blogger is so poor, here is a link to it on Youtube, https://youtu.be/7MQTqOybHtE


Most of the interior details I designed for printing at Shapeways.  The design details were covered in several posts last year.  The first covered the Metal Shaper and the Bandsaws.  The second instalment covered the Large Lathe, Vertical Milling Machine, Air Compressor and Bench Grinder.  The third post covered the Surface Grinder, Horizontal Mill, Drill Presses and Welding Tanks.  And here is a Youtube link for the interior video, https://www.youtube.com/watch?v=SZST7eSKWHM&feature=youtu.be.


The details from Shapeways can be purchased at:  https://www.shapeways.com/product/GK2H7F2E6/machine-shop-tool-set-2.  The set includes a smaller lathe that is not in this shop.

Thursday, January 5, 2017

3d Printed, Arch Roof, Clear side walls, Machine Shop.

Although this building has a full interior, this post will mostly cover the structure.  The building was printed on my Afinia H479 printer in ABS.  I designed it in SketchUp and sized the openings to fit Tichy windows and doors.  HO scale.

I designed the machine shop tools a year ago, and had them printed at Shapeways.  I posted about them in three previous posts.

Part one: Metal Shaper, Bandsaws
Part two: Large Lathe, Vertical Milling Machine, Air Compressor, Bench Grinder
Part three: Surface Grinder, Horizontal Mill, Drill Presses, Welding tanks


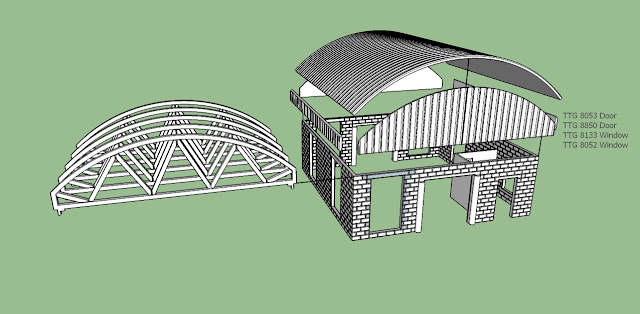
 Here are all the parts, as originally drawn.  I designed the upper side walls, and the gable ends to be printed in transparent filament.  It is marketed as clear, but it certainly is not.  I does work great for glass blocks, spiral-chimney-glass-blocks and memphis-store-front-3d-printed-glass-blocks

There are always things that I would do different if I were to do it again.  If I were to print the end panels again, I would add the support material shown in the drawing on the left, to give the panels a cleaner edges on the lower curved edges.  The picture on the right shows how I printed the ends I used.  If you look closely, you can see the rough edges.

The roof parts, painted and ready to assemble.

I would say that I am test fitting the roof on the walls, but you can probably figure that out on your own.

The roof and walls are printed in natural ABS, primed and painted, the roof silver and the walls gray.

Test fitting the Tichy Windows.  Both Grandt Line and Tichy have good web sites, where they show all the openings needed for the windows they offer.

 I had not originally planned on making a diorama, but I decided to in the end, adding a welding table out front, and a storage rack.  The storage rack was 3D printed on my printer.  The material on the rack is from the junk bin.  Mostly left over shapes from wood car kits, where I replaced the wood shapes with styrene.  

The diorama base was also needed for protection for the windows, if was was going to have any of them open.

I did add a minimal interior to the office, but unless I stick some lighting in it, it is barely noticeable. Both the rolltop desk and the chair were 3D printed in wood, so no finishing was needed. 

 I added some angle around the roof, so it would fit tight on the building. 


I am sure I forgot something, but this post is getting way to long, so I will end it here.  I prefer to spend my time modeling, versus writing about it.  I have 23 posts in various stages of editing.  Back to modeling.

Previous 3D printed structure posts that might be of interest: