Although this building has a full interior, this post will mostly cover the structure. The building was printed on my Afinia H479 printer in ABS. I designed it in SketchUp and sized the openings to fit Tichy windows and doors. HO scale.
Part one: Metal Shaper, Bandsaws
Part two: Large Lathe, Vertical Milling Machine, Air Compressor, Bench Grinder
Part three: Surface Grinder, Horizontal Mill, Drill Presses, Welding tanks
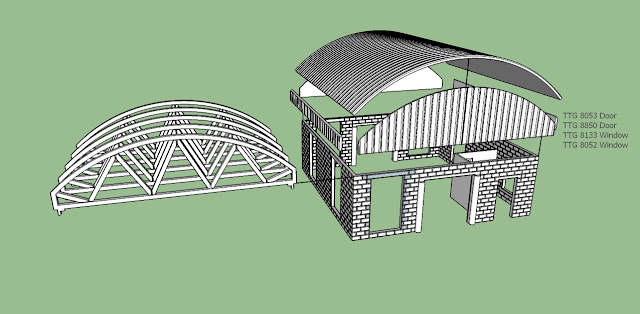
Here are all the parts, as originally drawn. I designed the upper side walls, and the gable ends to be printed in transparent filament. It is marketed as clear, but it certainly is not. I does work great for glass blocks, spiral-chimney-glass-blocks and memphis-store-front-3d-printed-glass-blocks
There are always things that I would do different if I were to do it again. If I were to print the end panels again, I would add the support material shown in the drawing on the left, to give the panels a cleaner edges on the lower curved edges. The picture on the right shows how I printed the ends I used. If you look closely, you can see the rough edges.
The roof parts, painted and ready to assemble.
I would say that I am test fitting the roof on the walls, but you can probably figure that out on your own.
The roof and walls are printed in natural ABS, primed and painted, the roof silver and the walls gray.
Test fitting the Tichy Windows. Both Grandt Line and Tichy have good web sites, where they show all the openings needed for the windows they offer.
I had not originally planned on making a diorama, but I decided to in the end, adding a welding table out front, and a storage rack. The storage rack was 3D printed on my printer. The material on the rack is from the junk bin. Mostly left over shapes from wood car kits, where I replaced the wood shapes with styrene.
The diorama base was also needed for protection for the windows, if was was going to have any of them open.
I did add a minimal interior to the office, but unless I stick some lighting in it, it is barely noticeable. Both the rolltop desk and the chair were 3D printed in wood, so no finishing was needed.
I added some angle around the roof, so it would fit tight on the building.
I am sure I forgot something, but this post is getting way to long, so I will end it here. I prefer to spend my time modeling, versus writing about it. I have 23 posts in various stages of editing. Back to modeling.
Previous 3D printed structure posts that might be of interest:


Kent,
ReplyDeleteLove what your doing with the 3d printer, I just recently got one but never expected to be able to get so much detail in HO Scale. Have any links to tips or others who are doing this?
Thanks
Tim
All the tip I have would be somewhere in my blog. Just take a look through them.
ReplyDelete