Sunday, December 28, 2014

A couple small dioramas, using failed 3d printed parts.

Not a lot of modeling time, and even less time for 3d printing and such, as we are remodeling a bathroom.  I have received a laser cutter kit, but have not found the four hours or so needed to do the assembly.  Then I will need to figure out how to use it.

Abandon block building, 3d print failure.

I am in the process of building a small machine shop with a completely detailed interior, all 3d printed.  The building is close to done, but the machinery will have to wait on the arrival of an SLA printer, and the time to figure out how it works.

This is a test fitting of some of the parts.  However, while doing a test print of the walls, the extrusion nozzle clogged, and I ended up with only half the walls.  Instead of throwing away the walls, I built a diorama of an abandon, falling down building.

Here is a raw picture of the print, after removing some of the blocks to give it a crumbled look.

I still need to add more junk, particularly lots of concrete blocks.

The walls, when the print job failed, were all the same height, but I broke and cut some parts off to make it look like it was falling down.

The truss, also a 3d printed item, had a little warp in it, so I threw it on the floor, with one end through a window.  The office wall remains, in the top of the photo, is made of stripwood and paper,

The loader bucket is also a failed print.  The connections on the back did not form properly for its intended use, so I used it as junk.

I added electrical conduit and boxes, the boxes are styrene, and the conduit is waste material for changing colors of filament in the 3d printer.

I cracked the floor using a knife and stained up the floor using A&I.  Then I threw miscellaneous stuff from various junk boxes around the scene.  I drilled some holes in the floor and planted some weeds.  Still more junk to add, but I am probably years from installing on a layout, so I have time.

Scale House

I probably started this 20 years ago, seriously, maybe more than that.  I was just using some scraps I had laying around.  The scale house is scratch built from wood, and the windows and door are from the scrap box.

The inside details are a scale and man printed on some transparency film and back lit with an LED.

I will most likely use this at refinery on the eventual layout, but we will see.

Wednesday, December 24, 2014

HO mining engine on a Z scale mechanism, 3d printed

I wanted a small powered mining engine, so I started with a Z Scale power unit.  I picked up a Micro-Trains FB unit from modeltrainstuff.com like the one below, and designed a shell to go over it.  

 
$82.39 right now at modeltrainstuff.com


This is the drawing I came up with.  I designed it to just slip over the Micro-Trains mechanism.

I printed it in Shapeways, Frosted Ultra Detail material, which does not photograph well.

For a little more clarity, I threw on a wash of A&I.


\

I drilled the shell and installed grab irons.  The material is Acrylic, so it drills very nice.

The mining safety teem just painted the grab irons, and while they were at it, they gave the critter a name.

The rust is REAL rust, using Sophisticated Finishes.  http://www.patina.com/patina.html  Available at most art supply stores.  http://www.dickblick.com/products/instant-iron-and-instant-rust/

Comparing it to a standard gauge loco, it looks pretty good.

Now I need some mining cars to pull.  I am looking for suggestions on the mining cars.  Obviously they will need to scratch built, and I assume some brass involved to get any weight to them.

And it does run.  

Other shapeways prints I have written about.  The lawn mower repair show is the most popular...

Saturday, December 6, 2014

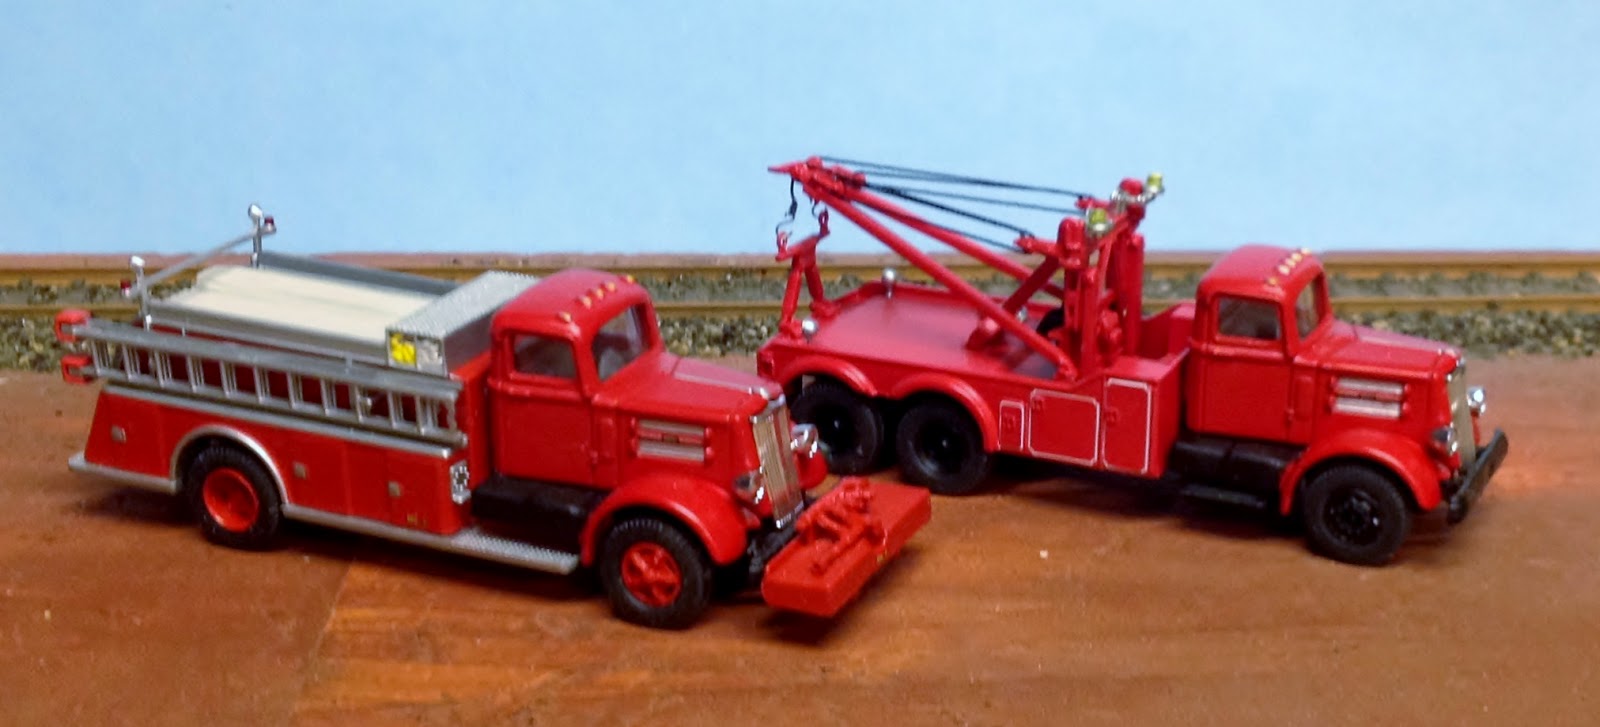
Quick HO vehicle kitbashes, Fire Truck & Tow Truck

These two are about the simplest HO vehicle kitbashes that you can do.  The back half of both are Athearn models, and the front half are from CMW (Classic Metal Works).  

 The fire truck was the easier of the two.  I was able to use the Athearn frame, and just needed to remove the bumper and file the gas tanks to get the CMW cab to fit.

Then I welded the bumper from the CMW frame to the Athearn frame and added the bumper mounted pump from the Athearn back on the the front.

 A pretty easy, one evening back kitbash.

I need to add a beacon to the roof, but I seemed to have misplaced the ones I had printed at shapeways.com.  Now I will just wait until I get the SLA printer I have on order, then print one..., or a dozen.


The tow truck was more work, but only slightly more trouble,  I did have to cut the frame and weld the CMW and Athearn frames together, so maybe not anymore trouble.

 In both cases the CMW truck was a single axle tractor, so those parts went in the scrap box, while the Athearn cabs went in the junk to sell box.

 On both trucks, I used the Athearn wheels and tires.

I do need to decal this for some company, but I don't know who yet.