The Afinia is basically extruding a .15mm diameter bead of ABS plastic heated to 250 degree Celsius. So, first off, you can't get better detail than .15mm. Second, at 250 degrees, it will melt together any details or surfaces that are close together. Part of the learning curve was finding out how close together different parts of an item could be without melting everything in to a blob. Also, what was the smallest cross section that could be printed. Because there are a lot of variables, this can be a moving point based on the size of the items, how much time the heated head spends in a small area, etc.
Here is a time lapse done by Christina Chun of an Afinia printer printing a gear key chain. Although it looks like it prints fast, I would guess this is a couple hours of print time.
http://www.youtube.com/watch?v=wIQaEYAq4Gs
One of the first of the larger items I printed was an HO scale elevator tower to sit on the roof of a building. To print in on the Afina, I broke it up in to several pieces. Here is an early drawing. It has a vent on three sides, and they are see through vents, so if you wanted to put a light in the tower, the light would show through the vents.
I broke it up in to four major parts, the walls, the roof, the vents and the door. Here is a picture of the walls and the roof as they were removed from the printer. Notice not only the raft that must be removed from under the
print job, but notice all the support material to hold up the walls above the door and windows.
The vents were a great learning experience. Testing how small the louvers could be, how close they could be to each other, and the thickness of the frames, how they would print, and how the vents would separate from the raft and support material. Below is a set of windows I did for a scratch build structure addition. I did not find a picture of the louvered vents as they came from the printer, but this will give you some idea of what it might look like. The clean-up is similar to cleaning a metal casting, except it is ABS plastic.
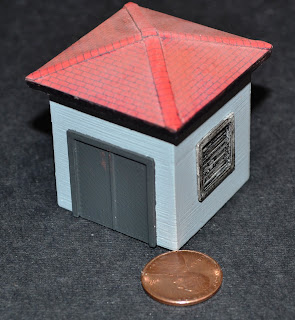
Here are a couple shots of a the assemble structure. It is HO scale, so the actual width measurement is about 1-3/8". The louvers are a scale 4' square.
Here is the painted elevator tower ready to install on a structure on the model railroad. The roofing is printed on photo paper from my drawings.
I did not show all the mistake, prints and reprints. I would guess the vents were drawn and printed at least four times, the door twice that I remember, and the walls and roof twice. If I were doing the walls again, I would print them upside down, which would eliminate the support material that was need to support the material above the door. Also note that the louver vents and door were printed laying down flat, like the windows in the picture above. In any other orientation, there would be too much support material to remove.


No comments:
Post a Comment