Showing posts with label HO Scale Model Railroading. Show all posts

Saturday, June 24, 2023

Layout update 6/11/23


The basement has walls, and hopefully the roof goes on the house this next week.  Here is a picture of the layout area as is it right now.


Here is how I have arranged the layout at this time.   

If you click on the drawing a large version will appear. 
Since it has been a while, here is the list of Givens and Druthers.  I believe I have 
Givens 
1. It is 1949. 
2. HO scale standard gauge main line. 
3. Line runs from North Staging (KC) to Car Ferry Dock at Van Buren, AR. 
4. Within reason, modular specifications to meet Free-Mo standards 
    a. http://www.free-mo.org/standard/ 
    b. 42” minimum radius on the main line 
    c. #8 Turnouts on the main line 
5. Main cities of Joplin, MO & Springdale, AR. 
6. The town of Splitlog must be represented. 
7. 3’ narrow gauge line (Trees Unlimited) somewhere south of Springdale a. associated with a large sawmill. 
8. 30” narrow gauge somewhere 
9. 18” operating mine railroad 
10.Interchanges:
    a. ATSF, MKT, KCS, MoPac & Frisco in Joplin. 
    b. Frisco in Springdale
    c. MoPac, KCS, Frisco in Van Buren 
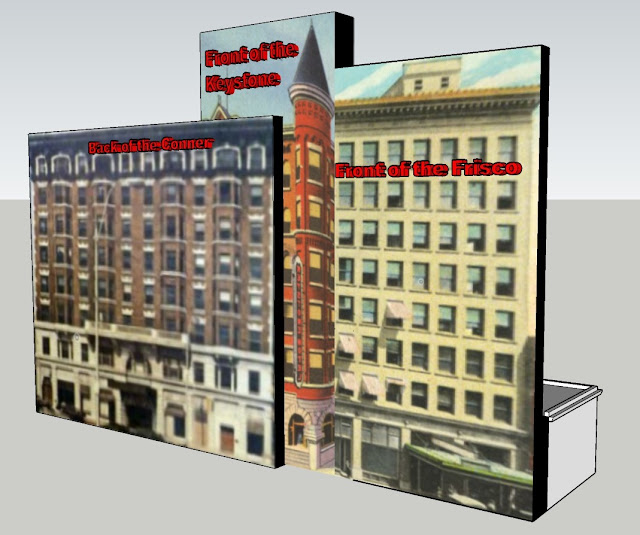
11.Joplin Union Station will be massively compressed, flat on the back with taller building flats attached to the back. I will have to do a drawing to make that make any since. 
 
Druthers 
1. Gulf Oil refinery somewhere south of Joplin. 
2. 36” aisles 


The layout sections are 26' in depth except for at Van Buren where it is 33".  Almost all section of the layout can be operated from both sides.  The only exceptions are this time are Joplin and the section with the large sawmill.  The concept for those two sections are shown below.

For some clarification on the Joplin section, here are some concept drawings.


The station and hotels will sit where indicated.  The Joplin station track side will have some depth to it, but the hotels will be flats.  I will have to get an artist to draw the hotels, as pictures of the back of the hotels are sketchy or non-existent.  I plan on mounting the hotel drawings on black foam core to give them some semblance of depth.  The total depth, as currently planned, will be about 6", and the length will be somewhat longer the 12", and about 7" tall.  The dark blue is the main line, and the light blue are passing sidings.


Between Joplin and Springdale the elevation of the main line will rise 3-4 inches, and this module is just south of Springdale.  Again, the standard gauge main line is in dark blue.  With the exception of this section, the layout could be run as double track, as there are passing sidings the entire length.  The 3' gauge track and the sawmill are on the upper portion blocked from this side by trees, lots of trees.  Viewing from this side, there is an 18" (Z scale track) mining railroad at zero elevation and it loops under the standard gauge and the sawmill.  Also, at the far right, you can see a small red section, that is the 30" gauge railroad that will be hauling the mined product away.  What are we mining, maybe unobtanium, maybe Vibranium, maybe?


Friday, December 25, 2020

Dixie Garage, Carolina Craftsman Kit

I have not been posting for over two years, and the main reason is I would rather spend time modeling than posting about it.  Therefore, don't expect any detailed descriptions, as not much time or thought is going into posts going forward. 

 The parts of the kit.

I am adding a garage door to the back wall, so I cut an opening using the front door opening as a template. 

I am using the scrap piece to fill in the old window opening.

I applied paper printed studs to the inside wall when the wall could be visible through the large doors.

The back patch came out pretty well.  As I recall, I used the rubber cement method for the pealing paint.  Dab some rubber cement on the siding before the finish coat of paint, then when the finish coat of paint is completely dry rub of the rubber cement.

I used a decal for the "GAS" sign, but all the others are printed on paper and glued to the building.


There a wood stove below the chimney, but it has obviously never been used, since the chimney is clean,

The truck cab is from Sylvan, and the bed and winch were 3D printed, as were the barrels, rusty fender compressor, gas bottles and wall fan.  The scuppers and downspouts were 3D printed using copper infused filament, and were weathered naturally using salt and ammonia. 

Thanks for looking.

Saturday, November 11, 2017

Mini-Lindy Kitbashes #1 & 2, Ford PU

A couple kitbashes of Mini-Lindy Ford Pickups


A shot of the two pickups, and the Packard as picked up of eBay. 

Dump Truck
A first test assembly with a dump bed I had in the parts bin.  I posted this on the 1/87 scale vehicle Facebook page for some feedback, and got just what I wanted.


I filled in the hole in the center of the hood, and 3D printed a shorter bed.

This model was missing the front grill and bumper.  I designed and 3D printed and new one. This was an early test, as I made some changes on the final assembly.

I 3D printed the frame, and made the dump bed so it would dump, although I never have found a way I liked to put a hydraulic cylinder on it.


Since the fans would be visible, I designed and printed several sizes in order to pick a size.

I fabricated the exhaust out of brass tubing.  

This model was also missing the windows, so I 3D printed a form and vacuum formed the windows.  The form is in the dump bed.


 In this view you can see the rusted exhaust manifold, another part I designed and 3D printed.

Tow/Boom Truck

I wanted to turn the other truck into a two truck.  In order to design the bed, I took straight on pictures of the truck, uploaded the pictures into SketchUp, and sized the pictures to scale.  


I drew the basic design right over the photographs to get the correct curves and dimensions.


On this one, I closed in the entire top of the hood.

I also designed and printed the boom and headache rack.  


I scratch built the winches

Sunday, January 8, 2017

Video of Machine Shop

A couple of short videos of the machine shop.  I gave it a spin on a turntable.  Construction of the building, which is 3D printed on a home printer, can be seen here.  Since the video upload to Blogger is so poor, here is a link to it on Youtube, https://youtu.be/7MQTqOybHtE


Most of the interior details I designed for printing at Shapeways.  The design details were covered in several posts last year.  The first covered the Metal Shaper and the Bandsaws.  The second instalment covered the Large Lathe, Vertical Milling Machine, Air Compressor and Bench Grinder.  The third post covered the Surface Grinder, Horizontal Mill, Drill Presses and Welding Tanks.  And here is a Youtube link for the interior video, https://www.youtube.com/watch?v=SZST7eSKWHM&feature=youtu.be.


The details from Shapeways can be purchased at:  https://www.shapeways.com/product/GK2H7F2E6/machine-shop-tool-set-2.  The set includes a smaller lathe that is not in this shop.

Friday, December 23, 2016

2016 Turkey Creek Build Challenge entry, Larry & Steve's Quality Automotive, part 2


In case you missed part 1, where I cover construction of the main building, 2016-turkey-creek-build-challenge-entry

A lot of scenic items and the small building were from the Woodland Scenics Smiley's Tow Service.
The parts in the Woodland Scenics kit.

 The diorama is about 12" square. The posts were cut from dowell stock, and the horizontal boards are from the Woodland Scenics kit.  I drilled holes of each post, to they are installed solid.  I used whatever I had laying around for the fence.  

 I had never used static grass before, but I was not going to spend a ton of money on a grasser.  I built mine using instructions by Ken Patterson.  Here is a link to his video, https://youtu.be/lHxDH8PyAzA

 I am not good with electronics, so if I can make one, any one can. The parts I bought to the left and the leftover parts for use someday for something to the right.

Here is the finished grasser.

Some examples of the applied grass.

I used several different brands of grass.  Whatever was available at the LHS.

I cut the souped up engines out of some old Hot Wheels I picked up at a flea market for 50 cents, and set them in the parking lot, as though they had just been delivered.

Larry and Steve are converting the old junk yard into a speed shop.  

 Larry and Steve have started fixing things up, a new sign, a new roof on the office, and replacing the bad boards in the fence.

 A view from the back, shows the patchwork fence still in place there.

 Details came from the Woodland Scenics kit, the junk box, and I 3D printed some.

 The vehicles, well the ones that are not junk, are from CMW.  The flatbed on the red truck is 3d printed, including the wood bed.  Here is a link to a blog entry I did on 3d printing with wood infused filament, 3d-printing-with-wood-wood-infused-pla


I circled a few of the items that I designed and 3D printed.  As mentioned in the previous installment, the roof ridge cap was printed in copper.  I have a couple of blog posts on 3D printing with copper, 3d-printing-in-copper part 1 and 3d-printing-in-copper-2-3-weathering.  The Chimney was also 3D printed.  In the front corner of the fence is a pile of copper scrap.  This is scrap from printing in copper, and I ground up the scrap in a blender before weathering it.  The gate, including the corrugated metal were also 3D printed.  To the left are the four truck bodies I designed and printed, including the trash truck body.  Two the car frames were printed, and the one mostly buried in grass came with the Woodland Scenics kit.  The two big wheels, pole road engine wheels, the large tires next to the trash truck, and the fan blade were also printed, as was the yellow car body in the near corner.