Showing posts with label fire house modeling. Show all posts

Saturday, June 20, 2015

Jaws of Life, 3d printed in HO scale

Weeks ago, someone on a Facebook group, ask where to get HO scale Jaws of Life.  I was able to get some good picture and dimension of the the web, and there were some drawing online to start from.  

Everything was sized to match the specifications on shapeways.com for printing in Frosted Ultra Detail.  

I connected the parts with a sprue so, hopefully, the parts won't get lost at Shapeways.  This is how they look right out of the package from Shapeways,

And from the back side.

On this batch of stuff from Shapeways, I tried rinsing them in Isopropyl Alcohol, as was suggested by several people, to remove the wax support residue.  

Just like cleaning with soap and water, it turns the items white.  That has it's advantages, as the items are actually easier to see and photograph.

 I don't model modern stuff at all, so I really had no emergency vehicles to show with the parts, but for size comparison, I photographed them with a CMW HO scale van.

 I primed them and painted them with craft paints.

 Since I put the HO scale ones up for sale on shapeways.com, I have had a request for them in S scale, so I have rescaled them and offered them in S scale also.


Saturday, December 6, 2014

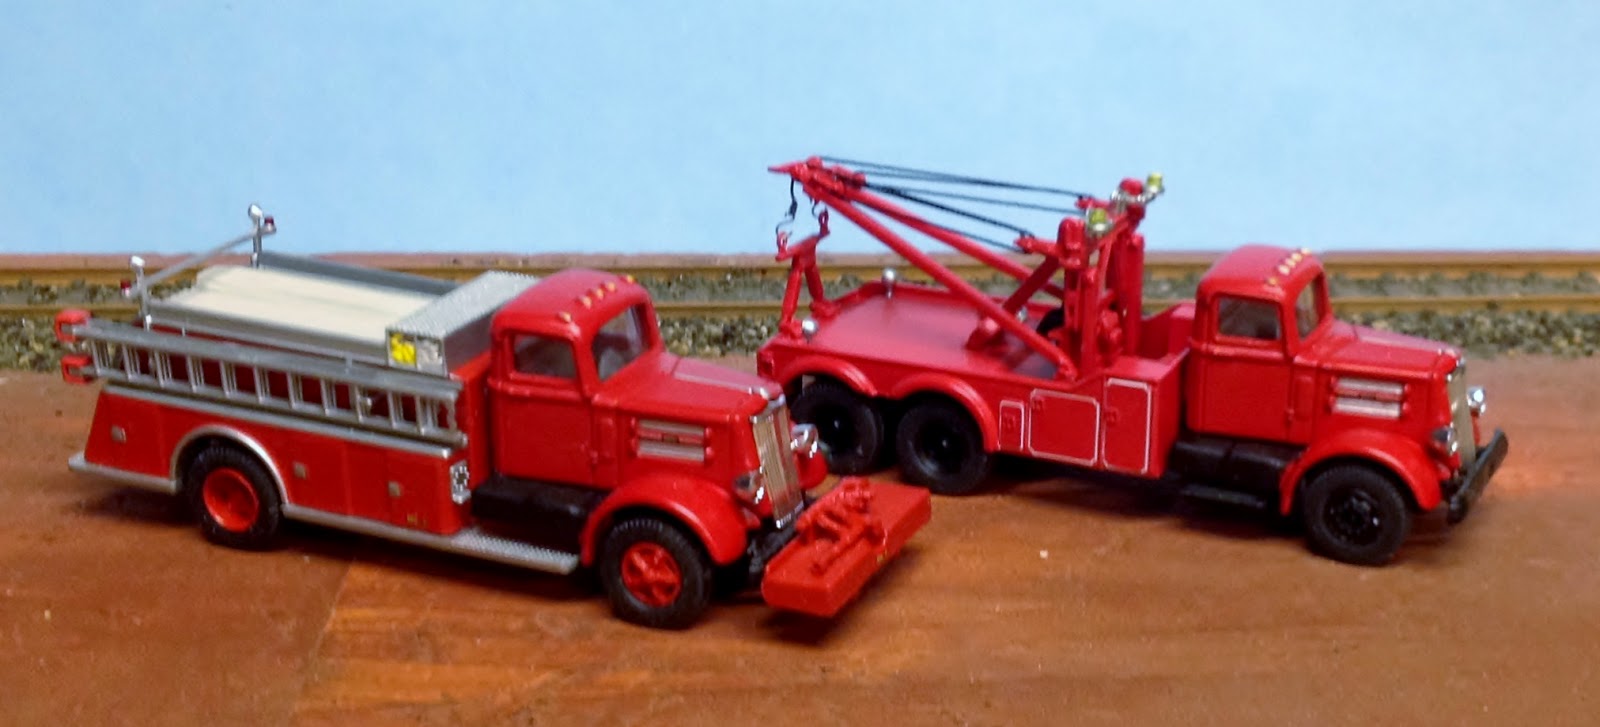
Quick HO vehicle kitbashes, Fire Truck & Tow Truck

These two are about the simplest HO vehicle kitbashes that you can do.  The back half of both are Athearn models, and the front half are from CMW (Classic Metal Works).  

 The fire truck was the easier of the two.  I was able to use the Athearn frame, and just needed to remove the bumper and file the gas tanks to get the CMW cab to fit.

Then I welded the bumper from the CMW frame to the Athearn frame and added the bumper mounted pump from the Athearn back on the the front.

 A pretty easy, one evening back kitbash.

I need to add a beacon to the roof, but I seemed to have misplaced the ones I had printed at shapeways.com.  Now I will just wait until I get the SLA printer I have on order, then print one..., or a dozen.


The tow truck was more work, but only slightly more trouble,  I did have to cut the frame and weld the CMW and Athearn frames together, so maybe not anymore trouble.

 In both cases the CMW truck was a single axle tractor, so those parts went in the scrap box, while the Athearn cabs went in the junk to sell box.

 On both trucks, I used the Athearn wheels and tires.

I do need to decal this for some company, but I don't know who yet.

Sunday, August 11, 2013

Fire station update 1.1, interior details

I had several requests to make the "running gear rack", I wondered what it was called, available to others, which is not a problem.  It is something I designed, and printed myself, so all I had to do was figure a selling price.  I also want to make certain people understand what they are getting for their hard earned money.  With that in mind, here are some additional pictures, with measurements.

It looks like each set will be $2.00 including any taxes.  I will put them in a zip lock bag, and wrap them in bubble wrap, stick them in an envelope, and drop them in the mail.  Postage and handling $1.00 to North America (I am not in this to get rich) for how ever many you want.  If you will email me at kent.hurley AT rocketmail DOT com, and I will email you a paypal invoice.  If you want to send me a check, we can do that too, just email me.

Scale wise, these are HO scale, and, if you look at the pictures with the product still on the carrier from the print, the holes on the carrier are .10 inches, center to center.

Here is an extreme close up of the running gear rack.  In the case of this particular model, one could never get this close up view when the model is assembled. 

 Another view from a slightly different angle,

Here is a screen shot of what is being sent to the printer.  The print area is about 5" square, so I can print several of these at the same time.  As I recall, each one takes over 30 minutes to print.

If you would like to see a quick one minute video of these being printed, here is a link to the youtube video.
http://www.youtube.com/watch?v=ef06wz58oLE

Here is what it looks like when it come out of the printer.  Since every item I print is going to be painted, I print almost everything in natural ABS, which is hard to photograph.   I recommend priming before final painting, and there will be some flaws to fill or file and sand.

This is the same print, but I coated the parts with and alcohol and ink solution to show the detail better.  I will be including extra boots.  As you can clearly see, one of them came loose during the printing process, and they are small and easy to drop. Note the holes in the toes of the boots that will need filed; I just used a dab of paint.

Soooo, here is what you get, with few more boots, for your $2.00.  I will take them off the raft material, so what you see is what you get.