Tuesday, September 22, 2015

Piano's, HO Scale, 3d printed at shapeways.com

These can be used in a piano showroom or possibly as part of a factory scene.  I decided to build a store front, with big windows, and a full interior piano showroom.


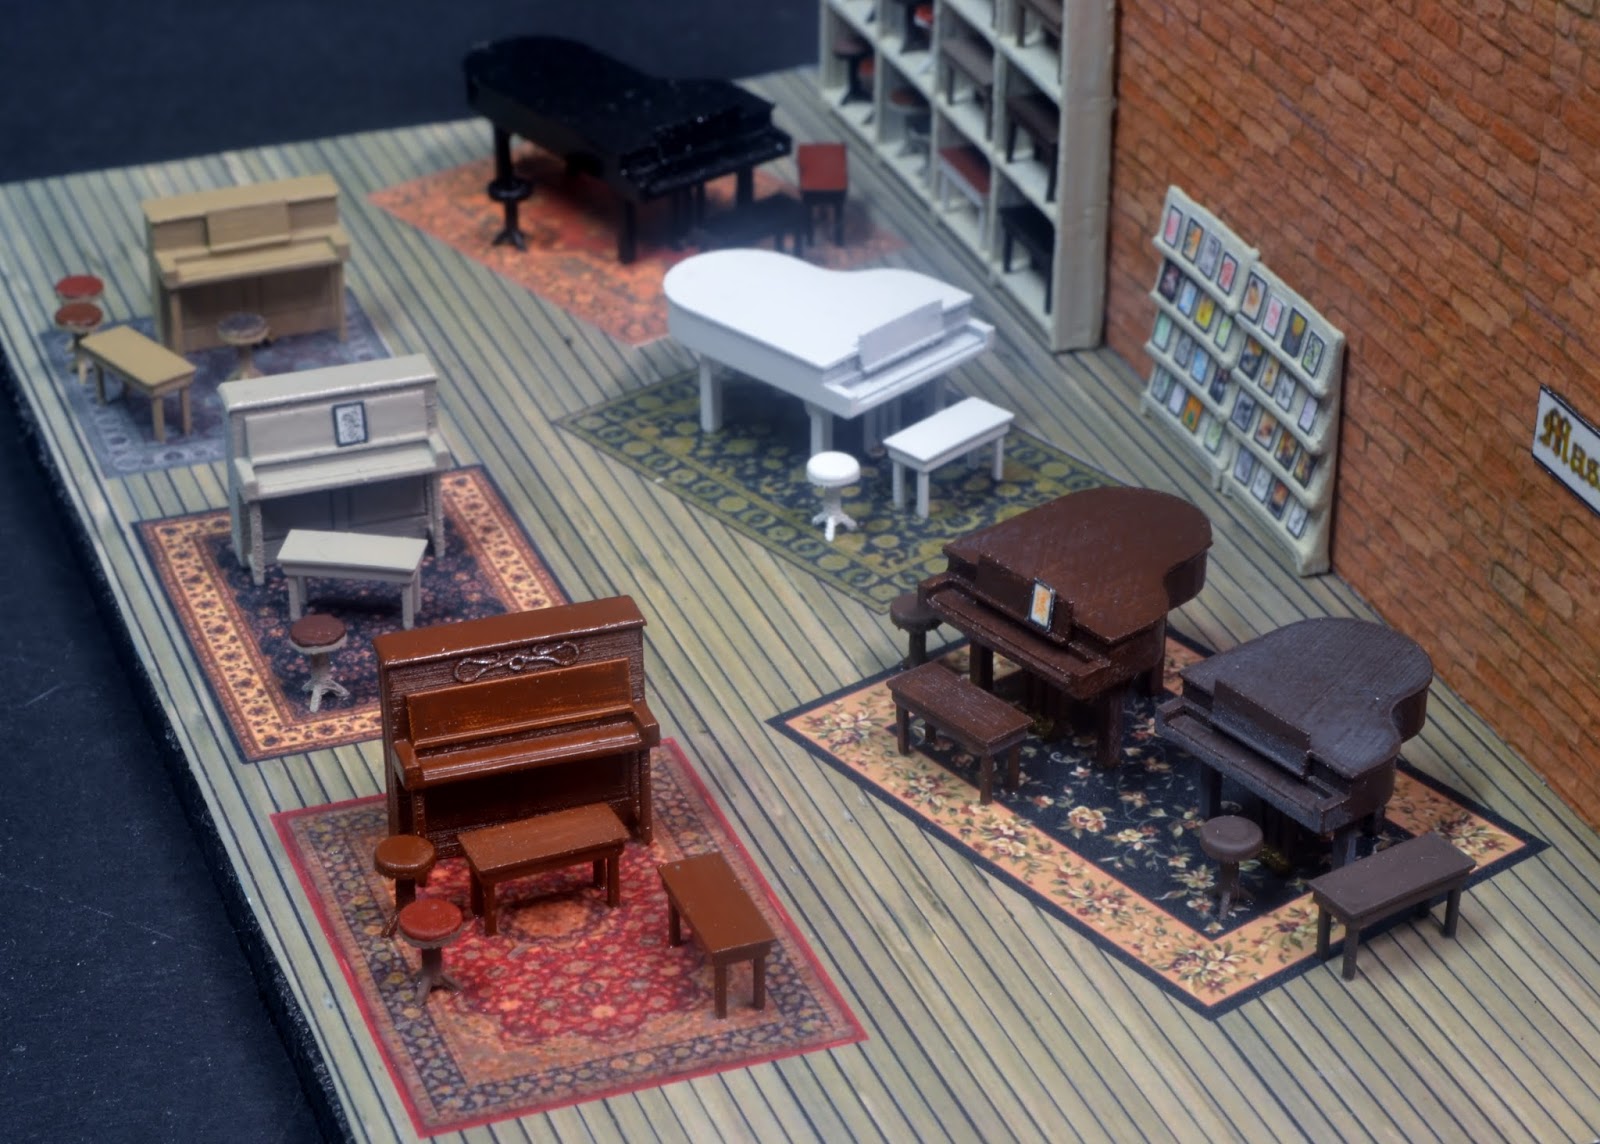
There is a lot of information on the internet regarding sizes and styles of pianos, so that was easy information to come up with.  In my assortment there are four sizes of grand pianos, and three sizes of uprights.  As usual, I drew them in SketchUp, full size, then scaled them down for 3d printing.  Because of the fineness of detail needed for these items, I sent the files to Shapeways for printing in their FUD material.  


FUD, Frosted Ultra Detail, is very brittle, and I broke a stool and the peddles of a piano.  Since Shapeways sent me LOTS of extra stools and benches, I did not bother trying to fix the stool.  I usually glue FUD with either CA or five-minute epoxy.  I had trouble with both, getting it to hold when the glueing cross-section is only .025 inches square was an issue.  Guess what I used, yeah, Aleene's Tacky Glue to the rescue.  


Note above that I said t Shapeways sent me lost of stools and benches.  I am not sure why, but I assume they had some issues with other items being printed in the same batch, and they ended up with extra benches and stools, like lots of extras, so they had no use for them, so I got them.  I used them to make a wall display of benches and stools, and I still had extras left over to put in my furniture box for later use.


For the store setting, I built  floor and one wall for now.  (The store front is under development, and will be posted at a later date.)  The floor and wall are just some scraps of 1/4" plywood that I had laying around.  I found images of wood flooring, rock wall and oriental rugs on the fabulous internet, and using PhotoShop and PowerPoint, I put together walls and flooring sheet to print out on photo paper.  

I coated the paper with dull coat to seal it, and obviously remove the gloss.  I painted the plywood flat black, then glued the paper to the plywood.  Anyone who knows me, knows what I used to glue the paper down, Aleene's Tacky Glue.  I use it for everything.  I don't thin it, I just brush it out very thin, and press the paper in to it.  Pressing the corners down extra hard.   

This assortment is available at piano-store-stock.

Here are some shots of the diorama as it stands now.

The shelves on the wall and the music rack were printed on one of my home printers, the M3D.


Note that every piano was to have either a stool or a bench, and I received enough extras to put at least one bench and one stool at each piano, put some on the shelves on the wall, and still had some left over!

The three smaller grands. 


I added a design to the front of the tallest upright.  This was 3d printed as a raise area, and then highlighted with a silver pen.

 The two smaller uprights.

A little lower angle side view.


My original plan was to have this be the view through the front windows.

But now, I think I may go with this end as the front.

FWIW, I plan on building the store front using a Cricut, and building it up in layers.  First I have to to learn a 2d CAD software.

Some of my previous blog entries with items that were 3d printed at Shapeways:


Saturday, September 12, 2015

M3D Printer #1, test prints


I purchased the M3D printers on Kickstarter.  If you are not familiar with Kickstarter, it is a crowd funding sight, so there is some risk involved, before investing, check out the project thoroughly.  Also, be patient, ALL technology projects run late, most of the time, several months.  If that kind of thing makes you loose sleep, don't get involved.  Enough of my disclaimer.  At the time the M3D Kickstarter was concluded, the M3D was the largest Kickstarter EVER, raising 3.4 million dollars from almost 12,000 backers!

The M3D is now available direct, and is made in the USA, http://printm3d.com.

I wanted the M3D to test filaments that I would not want to run on my Afinia, because of risk of damage to that machine.  Risking a $300 machine seems a lot more reasonable than a $1300 machine.  In particular, I want to run PLA filament that has been infused with Brass, Copper, Iron and Wood.  The Afinia is not optimized for using PLA, but the M3D is.

I first had the opportunity to play with the M3D at The Railroad Hobby Show, put on by the Amherst Railway Society.  We plugged it in at the hotel the night before we were to demonstrate it in the morning, and had it running in minutes.  Yes it was just that easy.  Pretty much plug-n-play.


Since an easy thing to print for me is wood or steel barrels, that is what we did as a test.  The first thing I noted is that it is SLOW.  The Afinia is not the fastest machine, but the quality of the prints is impecable.  The M3D took and hour to print four barrels, when the Afinia did them in 20 minutes.  In my opinion, time is not really the issue, quality of the print is what we, as modelers, are after.  While the machine is printing, there are many other modeling projects to work on.

Note that even 7-8 months from the early release software, M3D is still tweaking it.  Every time I start to use the printer, I check the web for updates.


The first prints, which we did in PLA, were very difficult to remove from the raft.  Since those initial prints at the show, my own machine arrived, and so far I have only printed in ABS at home.  Whether it is the ABS or the upgrade in software, the items seem to come off the raft much easier than they did in the early release.

My Test Print.


This is the same test print I did with the Afinia, to see what it will do, or, in some ways, what the software will allow the printer to attempt.  These are pictures of what the M3D will do.  As you can see, it could have been a cleaner print.  Of particular interest to me, the 1" thick wall (1" in HO scale, therefore, about .0115" thick).  The 1" wall and the 1-1/2" thick walls have started to print, AND those did NOT print using the Afinia.  Granted, they are not very good, but in the right situation, I might need a thin wall, and I have a chance with the M3D. The Afinia software, knowing that walls that thin are an issue, just ignores those thin walls.

As you can see in the view, as the print progressed, the thinner walls did not have enough surface to stay on the printing platform, and were knocked loose.  Not good, but if there was a thin section between two larger sections, then it would most likely work.  Again, something the Afinia would not allow.

BUT, 
WITH THE RECENT UPDATE IN SOFTWARE
WE GET A MUCH BETTER RESULT.

In the early stages of printing, all the walls are now sticking to the raft.

 And when finished, all the wall printed nicely.  The posts, not so much.

 This is a good improvement over the earlier software, but the filament is still stringing between the posts.  If the posts were further apart, the filament would have more time to cool, and I believe this problem would go away.

The M3D software will allow me to print thinner walls than the Afinia, which could come in handy on many projects.  

Although the M3D printed items stand on their own, I had to compare them to what I print on the Afinia.  Here is an item I wanted to use to display some wheels in a tire shop.  I printed it both on the Afinia, the black one, and on the M3D, the red one.  No real comparison.

 Crisp and clean

Lots of stringing of the filament between posts.  If that is all I had, it actually could be cleaned up and used, but it would take a lot of work.  All the posts are there, but there is a lot of stringing of the filament between posts that would need cleaned up.

HO scale barrels.  The black one was done on the Afinia, and the red on the M3D.

The red one is slightly rougher, but otherwise, it is better, thinner wall, just a tighter crispness on the barrel rings.  Both printed from the same drawing.

I was just about ready to put this post to bed, then I came up with a couple more test prints.  First, here are some speaker sound chambers.  The black one was done on the Afinia, and the red on the M3D, the M3D at it's finest settings.

 The difference in obvious.

In this extreme close up, you can readily see the issues with the box printed on the M3D, simply not solid around the edges, and it will take some clean up to be of any use at all.  Probably usable, but not crisp.

Then I thought of the wagon wheels I printed for a diorama, that I had to get done at Shapeways, as they were too fine to print on the Afina.  As you will recall above, the M3D software will allow me to print some smaller wall thicknesses than the Afinia.  Soooo, I ran a quick test.
I should have put a penny in the picture for size comparison, but the smaller wheel is about 7/16" in diameter.  The finished, weathered wheels were printed at Shapeways, cost about $1.00 each, by the time you add freight.  The one in the center, printed on the M3D, probably cost a penny or two.  Although obviously not as fine in detail at the ones from Shapeway, it is finer than I could have printed on the Afinia.  In fact, it is small enough, the Afinia would not have recognized anything, and would not have printed anything.  

Well I have to find more time to play with it, and gets some of the more exotic filaments ordered to try.  The wood filled sounds like a good thing to make wood barrels.  And the iron filled filament might work for underframes, as it would help with weight.    


Saturday, September 5, 2015

Tire shop, 1:87 scale, 3d printed details

I am an avid fan of HO scale vehicles, gas station, and the related buildings and details.  Somehow I decided to design parts for a tire shop.  Since I model 1949, I did it vintage.  I also designed the tools for a modern shop, which is available at shapeways.com, as is the vintage tool assortment.

My dad had one of these in the corner of the garage all the time I was growing up, I don't think it ever got used.

I draw in SketchUp.  The small parts are connected by a sprue, to get them above the minimum size allowable.

I searched the web for pictures of older machines, and this is what I based my balancer on.

And here is the lift I used for a prototype.

The completed set, including jack stands, impact tools, and floor jacks.


I included three sets of wheels, and four sets of tires

Here is what the 3d printed items looked like after washing in soap and water to get off the support residue.  They still need a little scraping with a knife to get some of the support material removed, see here as the white chalky substance. 

After priming.

The priming usually shows up a few more areas that need cleaned.  At some point in the process, one of the jack stands went missing when it broke from the sprue.

With details this fine, only FUD or XFD will work.  I use FUD as it is quite a bit less expensive.  From what I have seen though, XFD is much nicer, I just have not had a project where I could justify the extra cost.


I built a small display box to use as the shop, and test fit the tools around the shop.

The wheel rack on the left was printed on my home printer.

Here is an overall shot of the complete tire shop.  The floor and walls are paper glued to the wood.     I designed both in photoshop.

The signs are images I have picked up over the years, some were cleaned up with photoshop.  The tool panels on the walls were done the same way.


Here is good shot of the tire machine and the back wall of the shop.  

All the tools on the bench, including the vise, were printed as one piece.

I have used the compressor in several scenes, the first time in the small engine repair shop, http://nvrr49.blogspot.com/2013/09/lawn-mowersmall-engne-repair-shop.html

Link to the vintage shop on Shapeways: shapeways vintage-tire-shop-stuff

I also offer the vintage shop with an adjustable lift, so the axle supports can be place where needed, so you could put a car up on the lift.  Here is a link to that assortment: shapeways vintage-tire-shop-stuff-with-usable-lift

Link to the modern shop on Shapeways: shapeways modern-tire-shop-stuff  This group has two different lifts.

The wheels, jacks and jack stands came out really well.  The wheel rack will actually be featured in another post, as I did a comparison print of that item, using both the Afinia (http://www.afinia.com/3d-printers/h480) and the M3D to print it.  That will be part of my review of the M3D printer (http://printm3d.com/)

The tool box is another item I have used before.

Here is an overall shot of the shop.

Other details I have printed at Shapeways:
machine-shop-tools-3d-printed
machine-shop-tools-2-3d-printed

machine-shop-tools-3-3d-printed
chain-saws-ho-scale-3d-printed
jaws-of-life-3d-printed

Since I have been absent the last couple months, and have 16 draft posts I am working on, I hope to get three posts up over this long weekend.