Saturday, November 30, 2013

Fine Scale Miniature Coal Dock #155

Oh my gosh, nothing 3d printed on this one!  I have been working on this structure for over a year.  I started it late last year when I spent a week in a hotel room in Joplin helping my Jason open his store, Hurley's Heroes, https://www.facebook.com/hurleysheroes.  I did the basic assembly then, but just got back to it last month.

From fsmkits.com, I assume this an original magazine ad.  I built mine turned 180 degrees.  I do have a layout plan, and a place to put this.

The box as it come, just a bunch of stripwood, templates, instructions, and
metal castings.  The castings are what George Sellios, the owner of Fine Scale Miniatures, has become know for.  I bought my kit off ebay, and there were a few castings missing, but none of significance to me.  There we a lot more junk details than I used.  George likes his junk!

Finished diorama.


It seem like you always see things in pictures that you did not see before.  So now I have a couple areas to add more weathering.

Thursday, November 28, 2013

Long-Bell Lumber, Atlas lumberyard build almost the way it is supposed to be built.

As previously stated in the first entry in this series, http://nvrr49.blogspot.com/2013/10/long-bell-lumber-atlas-lumber-shed.html, I am building a lumber complex using the Atlas lumber yard as the basis for all three main buildings.  The first building I completed was the lumber shed that was all lumber, the link above, and this building has the cutoff saw and the table saw area included.  I built the lumber section more or less like Atlas intended.  

The box.

The base.  I used the base but cut off all the ground, and used the cabins elsewhere: http://nvrr49.blogspot.com/2013/09/logging-camp-cabins-outhouses-and-boat.html

Here was the basic layout for the I have planned for this lumberyard.  The office/showroom is to the left of the office, the all lumber shed from the previous post is next to it, and this shed is at the bottom of the picture, with the road running along the back, off the diorama.  I am planning of putting stacks of creosote treated lumber, and coal bins at the right end in this view.

 The lumberyard side of the building.  Yeah I still load it with product.

The street side, with advertising.

The street side from the other end.  The kit comes with the radial arm saw bench and shed.  

The street side showing the table saw area.  The table saw is an item I designed and had printed at shapeways.  The full set of tools is available here:

A close up view of the saw.  I originally designed the tools for use in a FSM Barnstead Lumber kit.  The rest of the tools can be seen here: 

I just finished printing all the pieces for the farm house for my farm diorama.  I hope to have it done in a couple weeks to continue that series.  I also should get a FSM coal dock done this weekend.  Working on lots of projects!

Sunday, November 17, 2013

Machine Shop, Woodland Scenics

If you have ever looked at one of my posts, you know I like craftsman kits.  The Woodland Scenics metal kits are really fun to build.  I posted a few pictures of this kit some time back, but the pictures were not very good, so I took some new pictures.

This picture is from the Woodland Scenics web site, (woodlandscenics.com) and shows all the parts to the kit.  Most people call these white metal kits.  They are kind of a soft metal, but not near as soft some out there.  

I built a diorama, incorporating some cast plaster junk piles, a Woodland Scenics tree, and a truck kit, also from WS.

The details are all cast in place on the walls of the building, and must be hand painted.  It takes some time, and a steady hand, but I enjoy it.  You can see immediate progress.  

The cast in details really add value to the kits.  If you click on the pictures, you can see a much larger view, and really see the detail.

Out back, I added some junk piles.

They are all cast plaster, three are from molds I made using liquid latex from 

wait for it

Woodland Scenics.

This is a plaster casting I purchased from Morse Productions, http://morseproductionsproducts.blogspot.com, always good stuff.

This railroad car junk pile was a plaster casting that I made from a master made from junk from the box-o-freight car parts.  I painted the plaster flat black, then dry brushed them with rust colored craft paints from Michaels, http://www.michaels.com/.

Another junk pile.

The truck is the WS #D217 Service Truck, 1914 Diamond T.

The business is named in honor of William Larry Williamson, Professor of Machine Tool Technology at Pittsburg State when I went there, oh so long ago.

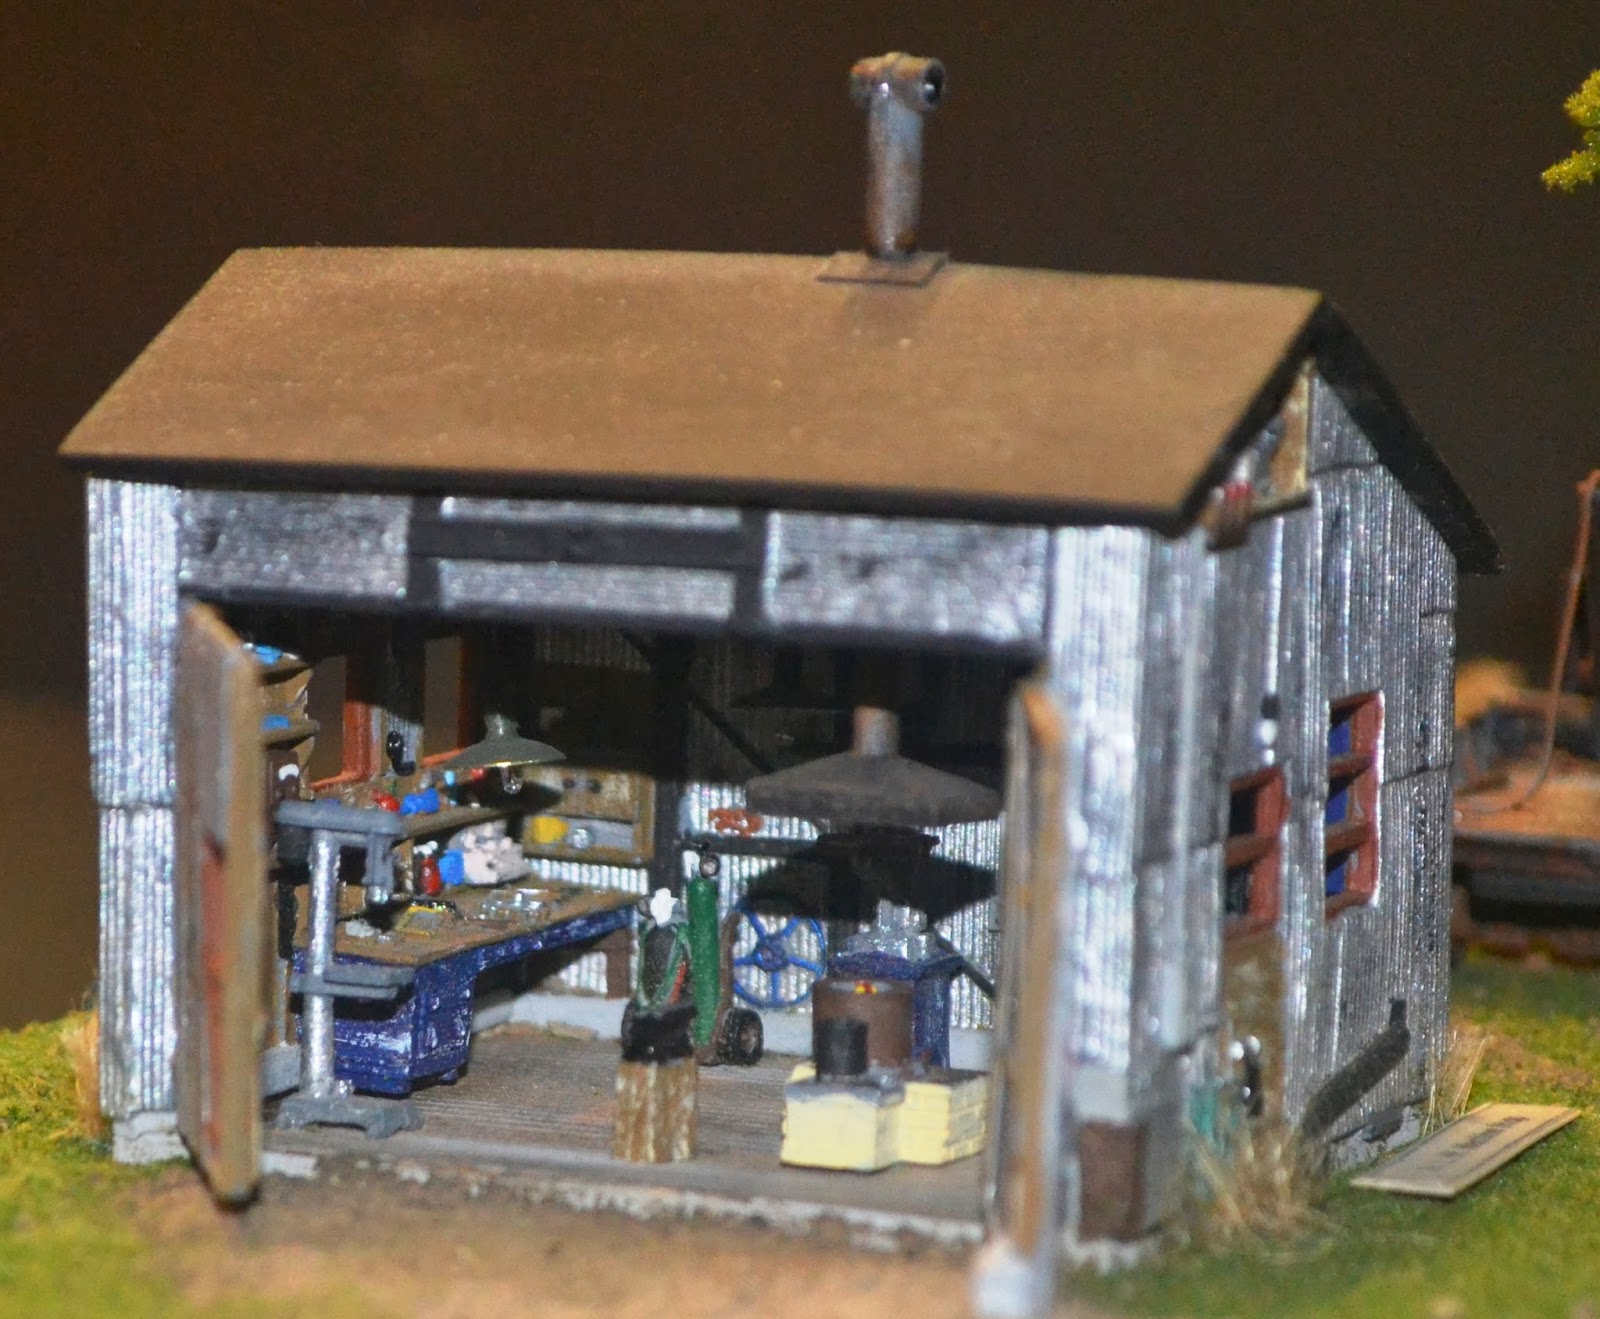
The kit comes with a full detail for the interior, plus all the details cast on the walls.  In the center it the forge and the anvil on a stand.  Along the back wall is a milling machine, and an oxy-acetylene welding set.

On the left wall is a work bench, note all the tools cast in top of it, and a drill press next to the bench.

On the right wall is a metal lathe and a bench grinder.

A few weeks ago, I pulled out four WS kits, and finished them all over two weekends.  Quick and fun, can't beat it!  More on those in the next week or so.

Sunday, November 10, 2013

Shop Building, Machinery Shed, Down on the Farm #4

The next structure I am working on for my farm diorama is the Machinery Shed.  I adapted my design from the plans below.  They are from the North Dakota State University web site, http://www.ag.ndsu.edu/extension-aben/buildingplans/.


As usual, it took several redesigns to get everything to print correctly.  As I recall, this was the fourth attempt.  I ended up printing the third rendition, and although it did not print correctly, it was close enough to go ahead and use.  After I figured out the problems with that design, I made the adjustments in the drawing shown above.  If I ever want to print it again, it should work better.

You can see in this picture that I added a lot of bracing to the walls.  In the drawing above, I added the bracing, so that all the bracing will be part of the print process.  I also make the walls around windows thicker, so the windows would be install flush on the inside.  This not only adds strength to the walls, but it make the windows easier to install.

One side pulled away from the print platform.  I believe this was mostly due to the walls being too thin, and not giving much area for adhesion to the printing platform.  I also found the platform to be slightly out of level, which is a real pain to adjust.  I let the print finish, even though I knew that this side was not printing right, because I knew that it would even out at some point, and this side is going to be under a shed.

I was originally planning on building the shed supports out of wood, but decided to give printing them a try.  Above is the progression of the design process.  Based on previous experience, I split the round posts in half, and printed them flat side down.  

I glued the two halves together, and painted them  The posts were finished to look creosote treated.  The set to the left was given an alcohol and ink wash.

I am ready to install the roof, but can't decide what to use.  I have been looking at several different options.  I don't care for the way the shingles on the slaughter house come out, and they were a lot of work (http://nvrr49.blogspot.com/2013/09/slaughter-house-3d-printed-down-on-farm.html).  Clever Models announced they were producing paper printed lase cut shingles.  Clever showed them this weekend at the Fine Scale Model Railroad Expo in MA, and Trainfest in WI.  They are supposed to have them available on their web site on Monday, and I will be ordering some to finish this building.  http://www.clevermodels.net/

The coal bin and chimney on the end are for the forge, which every good machinery shed had in 1949.

From another project, the Long-Bell Lumber diorama, I had a couple swing arm saws and benches left over.  (The first installment of the Long-Bell project can be seen here:  http://nvrr49.blogspot.com/2013/10/long-bell-lumber-atlas-lumber-shed.html)  The bench helps disguise the print failure of the side wall.  If I get the roof shingles ordered tomorrow, maybe I can finish this building up in the next couple weeks.

As a city boy, I have been asking questions along the way, cause hog farming is not something I have any familiarity with.  From that feedback I am going to add a corn crib, a small hog barn and a feeder. I think somebody makes a lazer cut wood corn cribs, which sounds like the best option.  As yet, I have not picked out a hog barn or feeder yet, but I will be perusing http://www.ag.ndsu.edu/extension-aben/buildingplans/swine to decide which one to build, and how to build it.

Previous posts in this series:

Thank you for looking.  If you would like to be informed when I make a new post, click on the blue. "join this site" button along the left side of the page.

Friday, November 8, 2013

Odds and Ends, a.k.a Giggles too

This is a test print, I believe my fourth design, of an octagon cupola for my Octagon barn.  I think is will suffice.  I should get the next post in my "Down on the Farm" series up in the next week.

I started the series with the Smokehouse, and ask the question at the time, "how do I model HO scale wood ashes?"  I came up with a couple ideas, and would appreciate some feedback.
Here is option 1
and here is option 2

Which do you think looks better?

I decided to organize my Woodland Scenics collection a couple weeks ago, and ran across a few duplicates. (http://woodlandscenics.woodlandscenics.com/?) I thought I had gotten rid of all the duplicates several years ago when I inventoried everything, but...I guess not.

I like the metal kits, but they have kind of fallen from favor.  I am working on two Mini-Scenes, the "Outhouse Mischief", and the "Tommy's Treehouse".  Also I am building the Doctors office and shoe repair buildings along with a pair of John Deere tractors, the steel wheel type..
Anything that I had two of, I started one of them.  If I don't screw up the one I build, then I will sell the duplicate at the upcoming KCI show.  FYI, I already lost one of the front wheels to a John Deere tractor.  Anybody have a spare?

Thursday, November 7, 2013

Gloria (Boot) Sardou

My Aunt Boot passed away last week at the age of 87. Here are some pictures of her through the years, and a tribute freight car I made to her several years ago.


The flat car was a Roundhouse shorty, and the wine casks are G scale wood barrels.  I used individual decals for lettering.  The Sardous, being of french decent, were wine producers in France.

The car number is her date of birth, 7/5/26.